← Back to modifications

Featured community modification · Solar

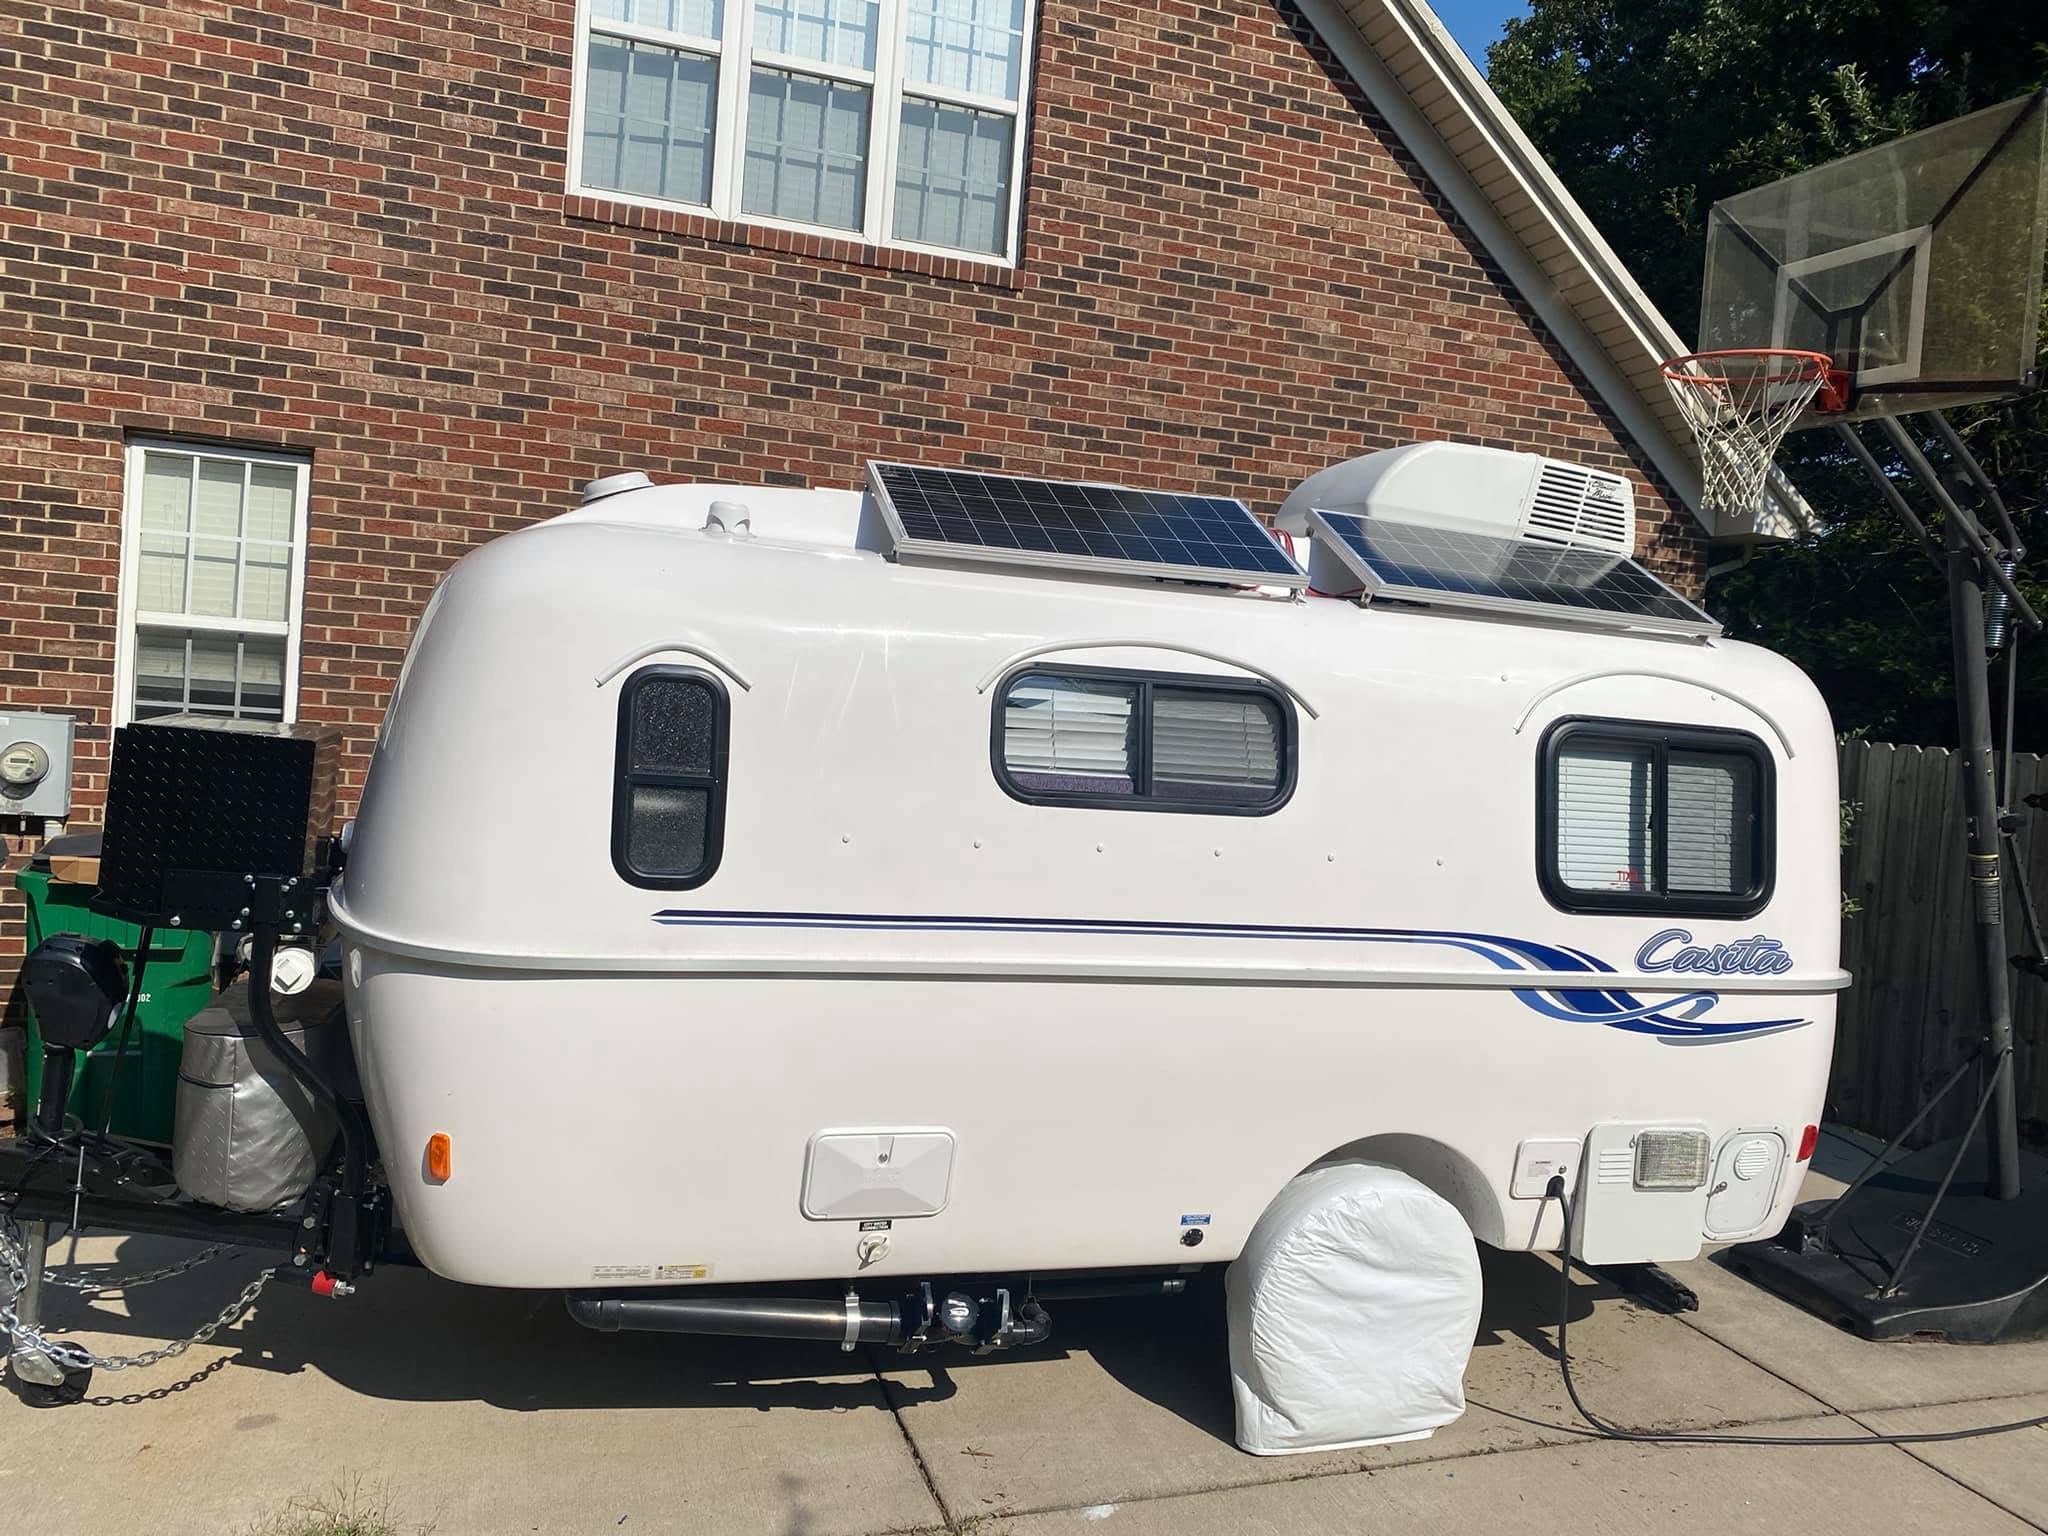
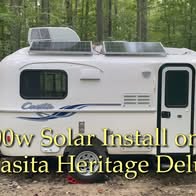
400W solar install on a 2021 Casita Heritage Deluxe

One of the prominent community solar builds that influenced Cozy’s later system, shared here with Steve’s permission. The complete original post, photos, walkthrough, and Facebook discussion are included below.

Steve Lineberry

Casita Life · September 12, 2021 · Shared with permission

Original post ↗

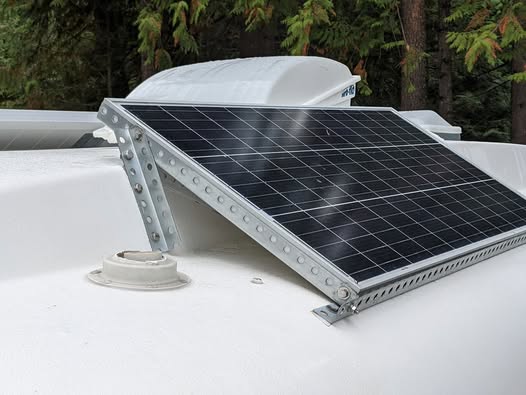
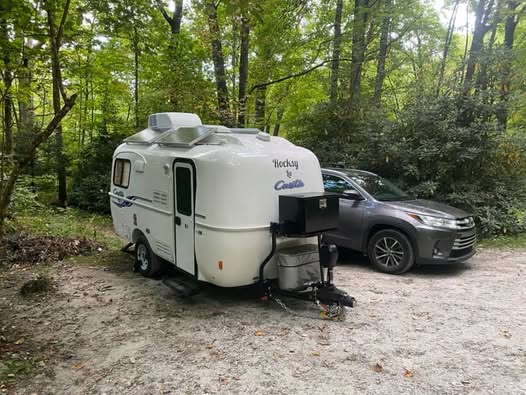
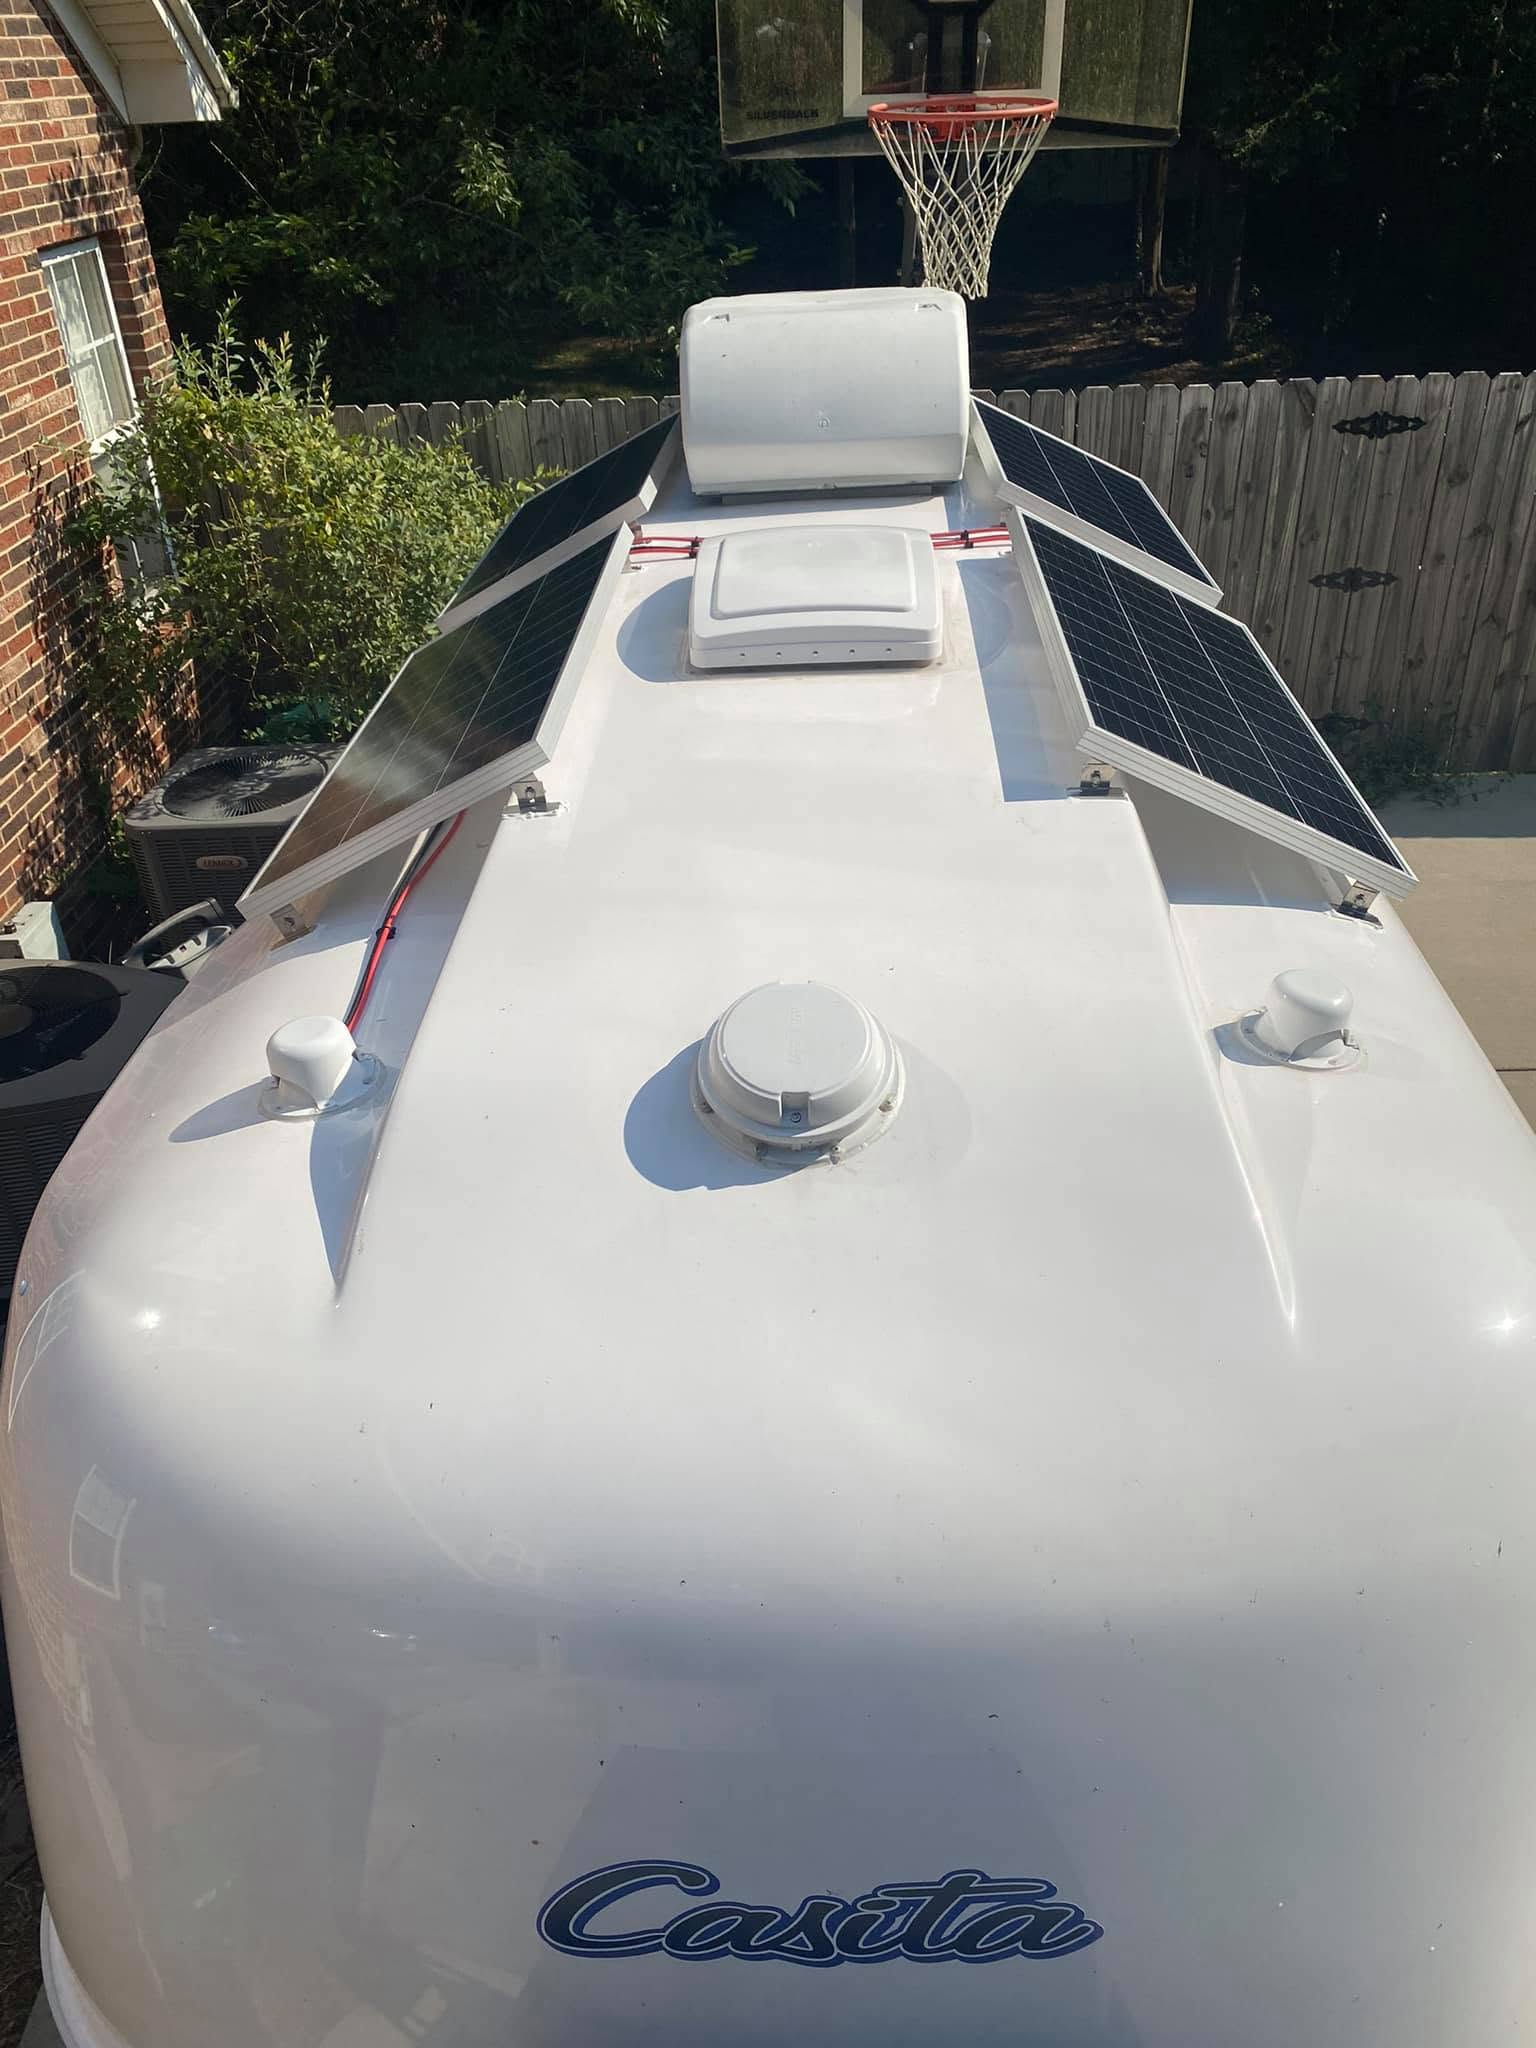
Finally finished the solar install on our 2021 Heritage Deluxe.

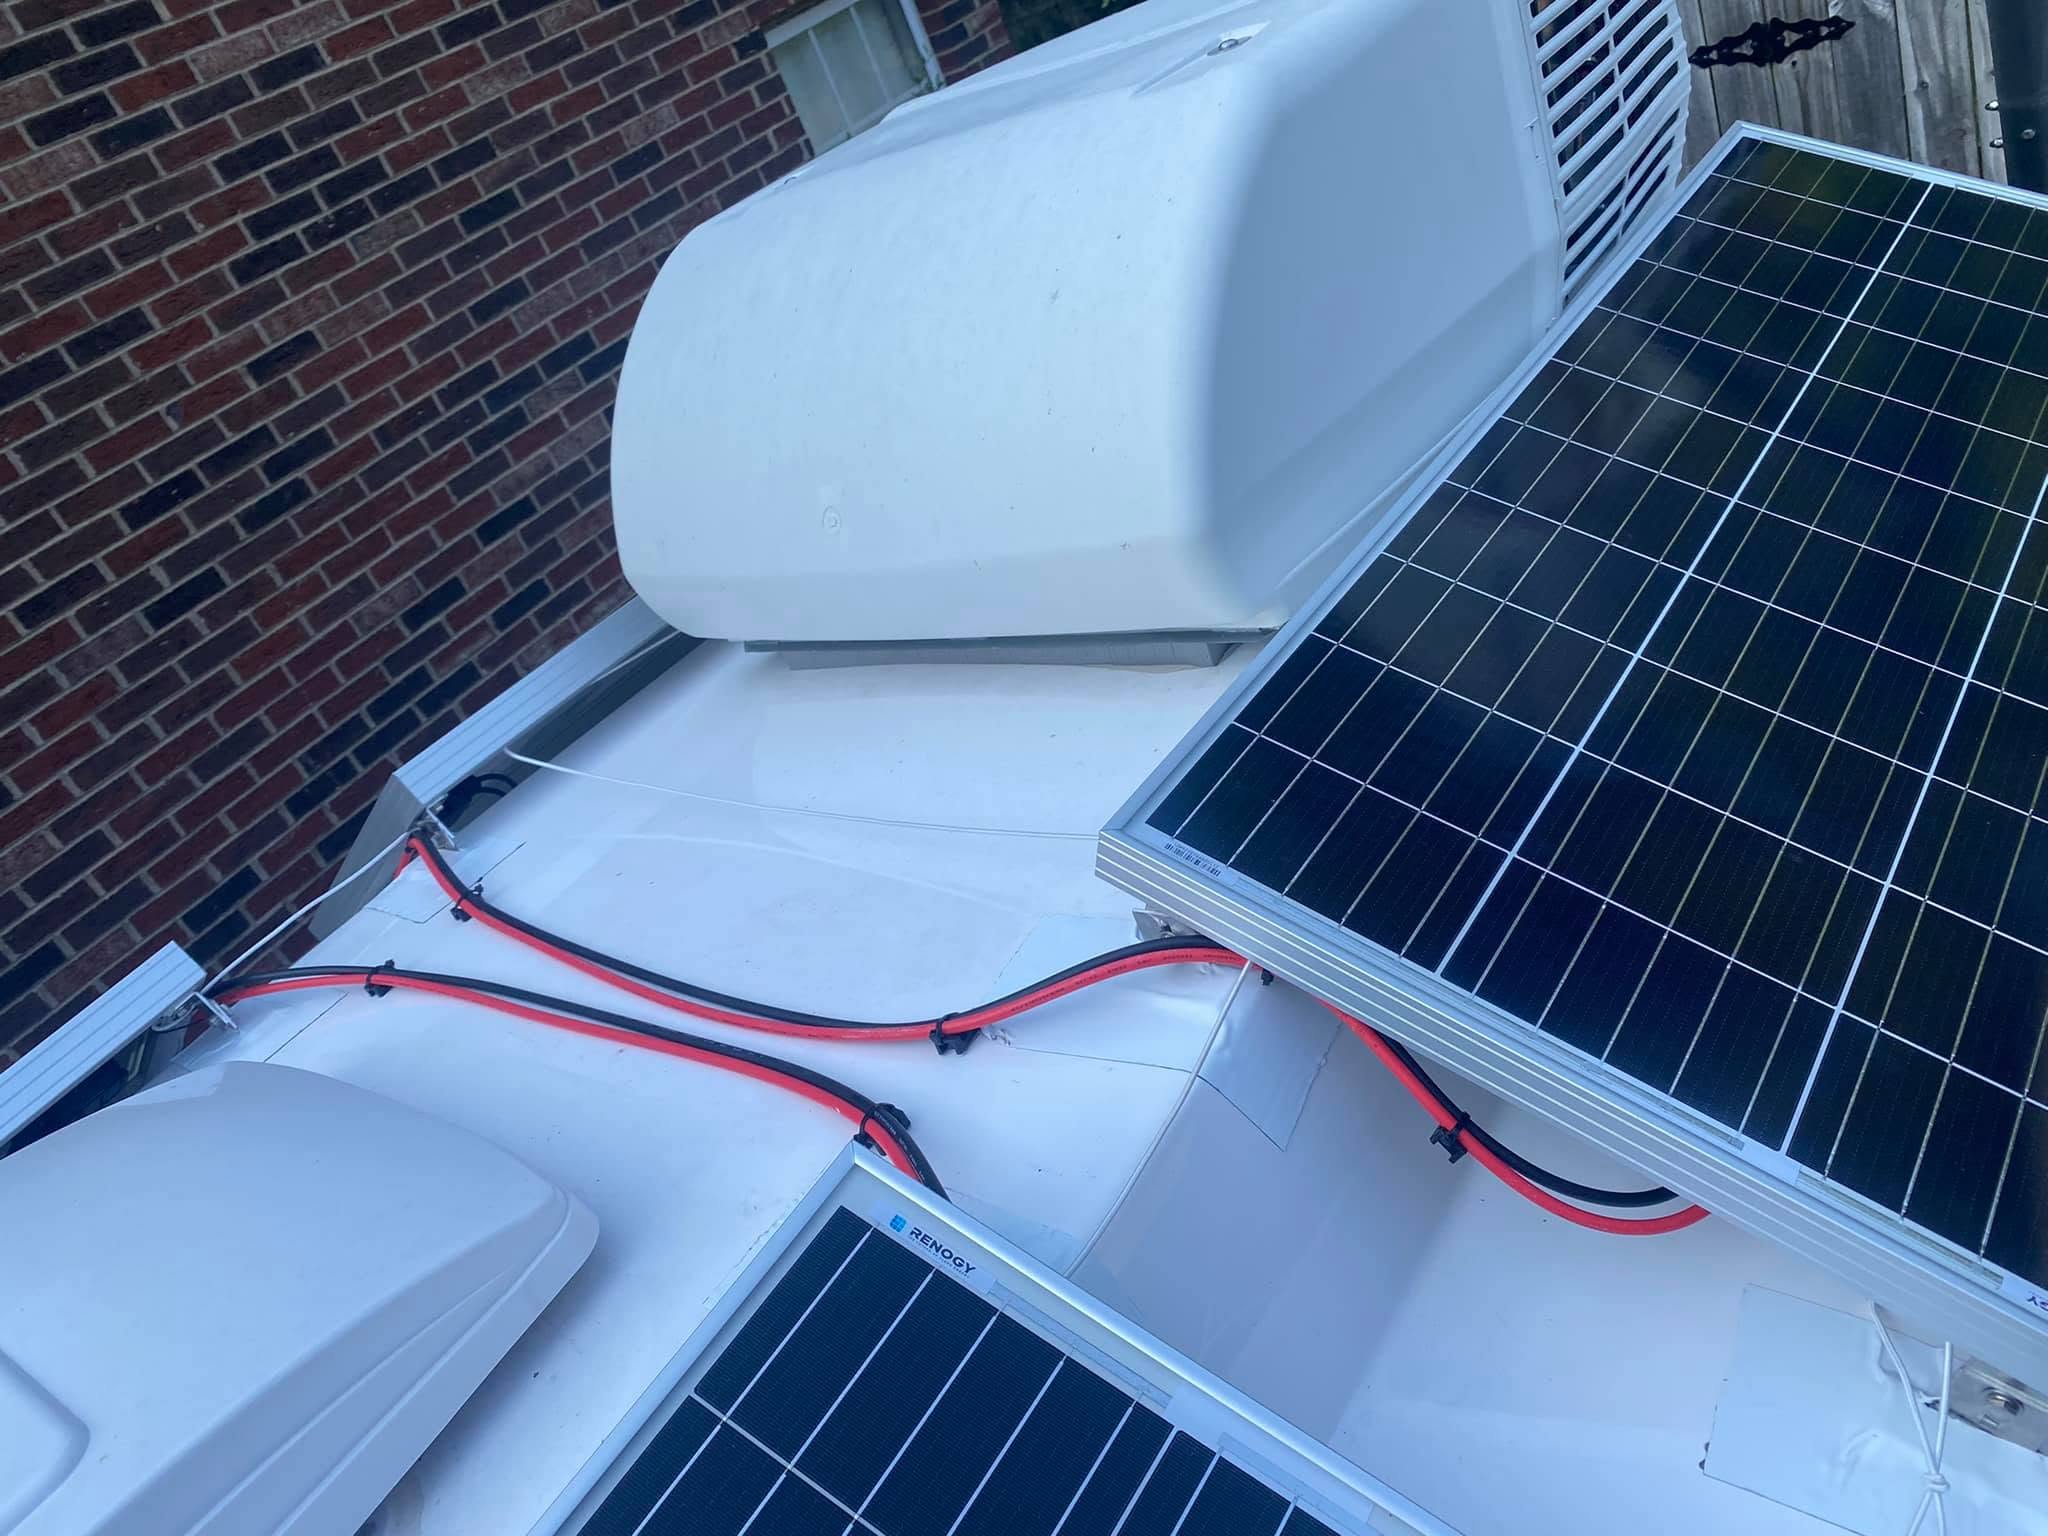
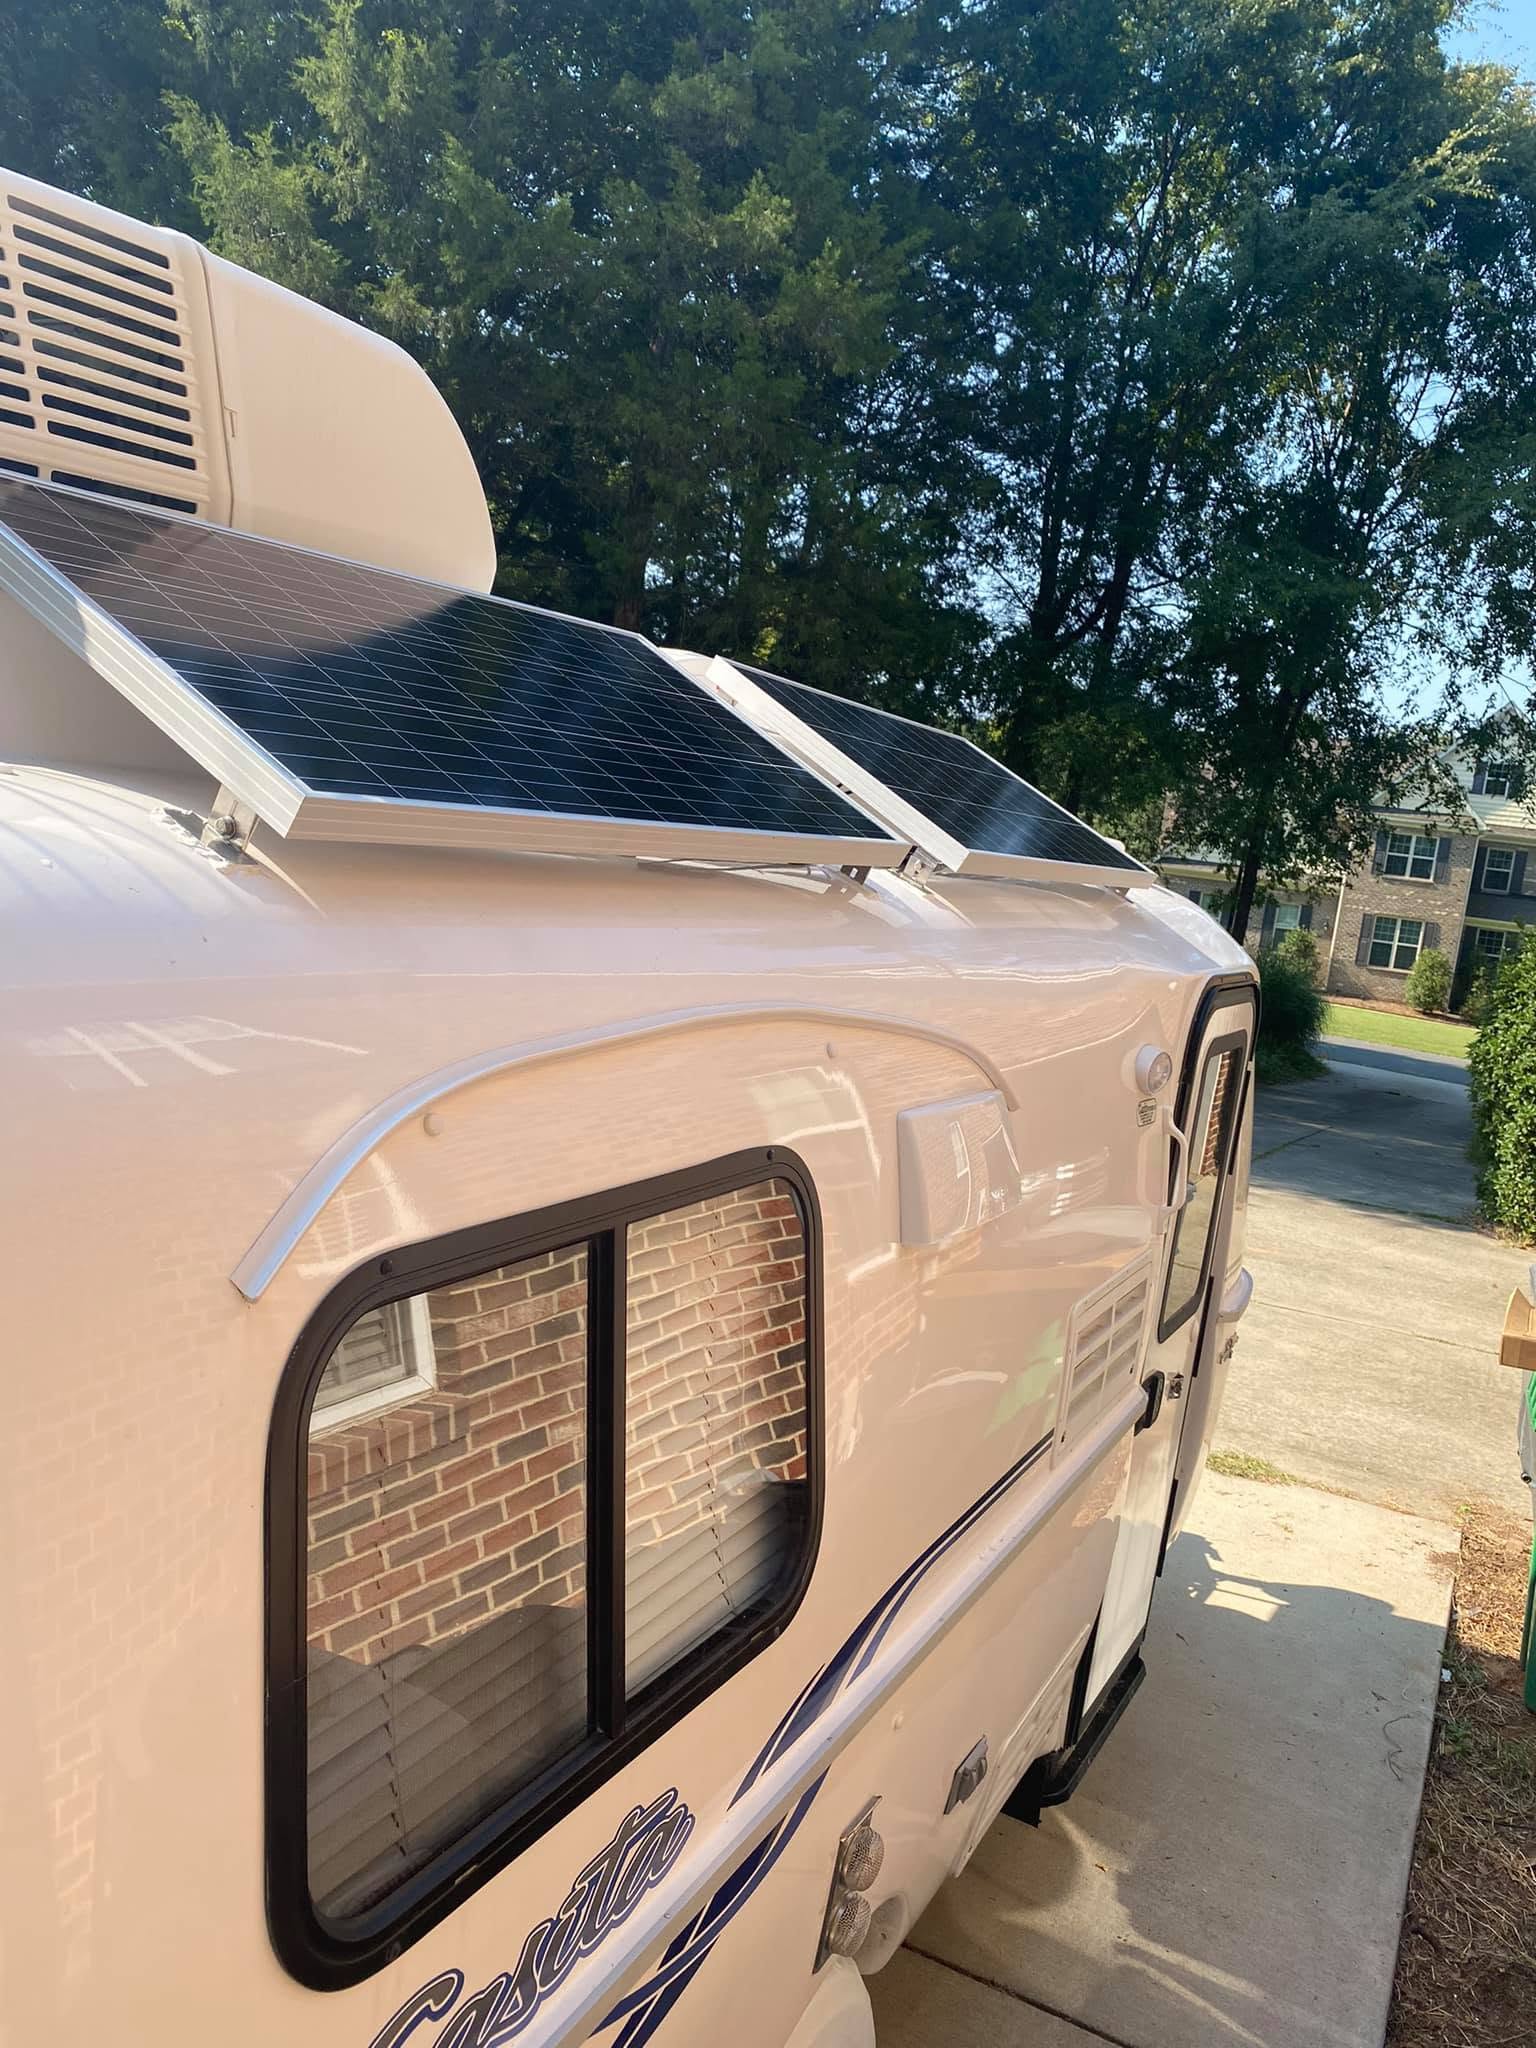
  • 4 x Renogy 100w panels
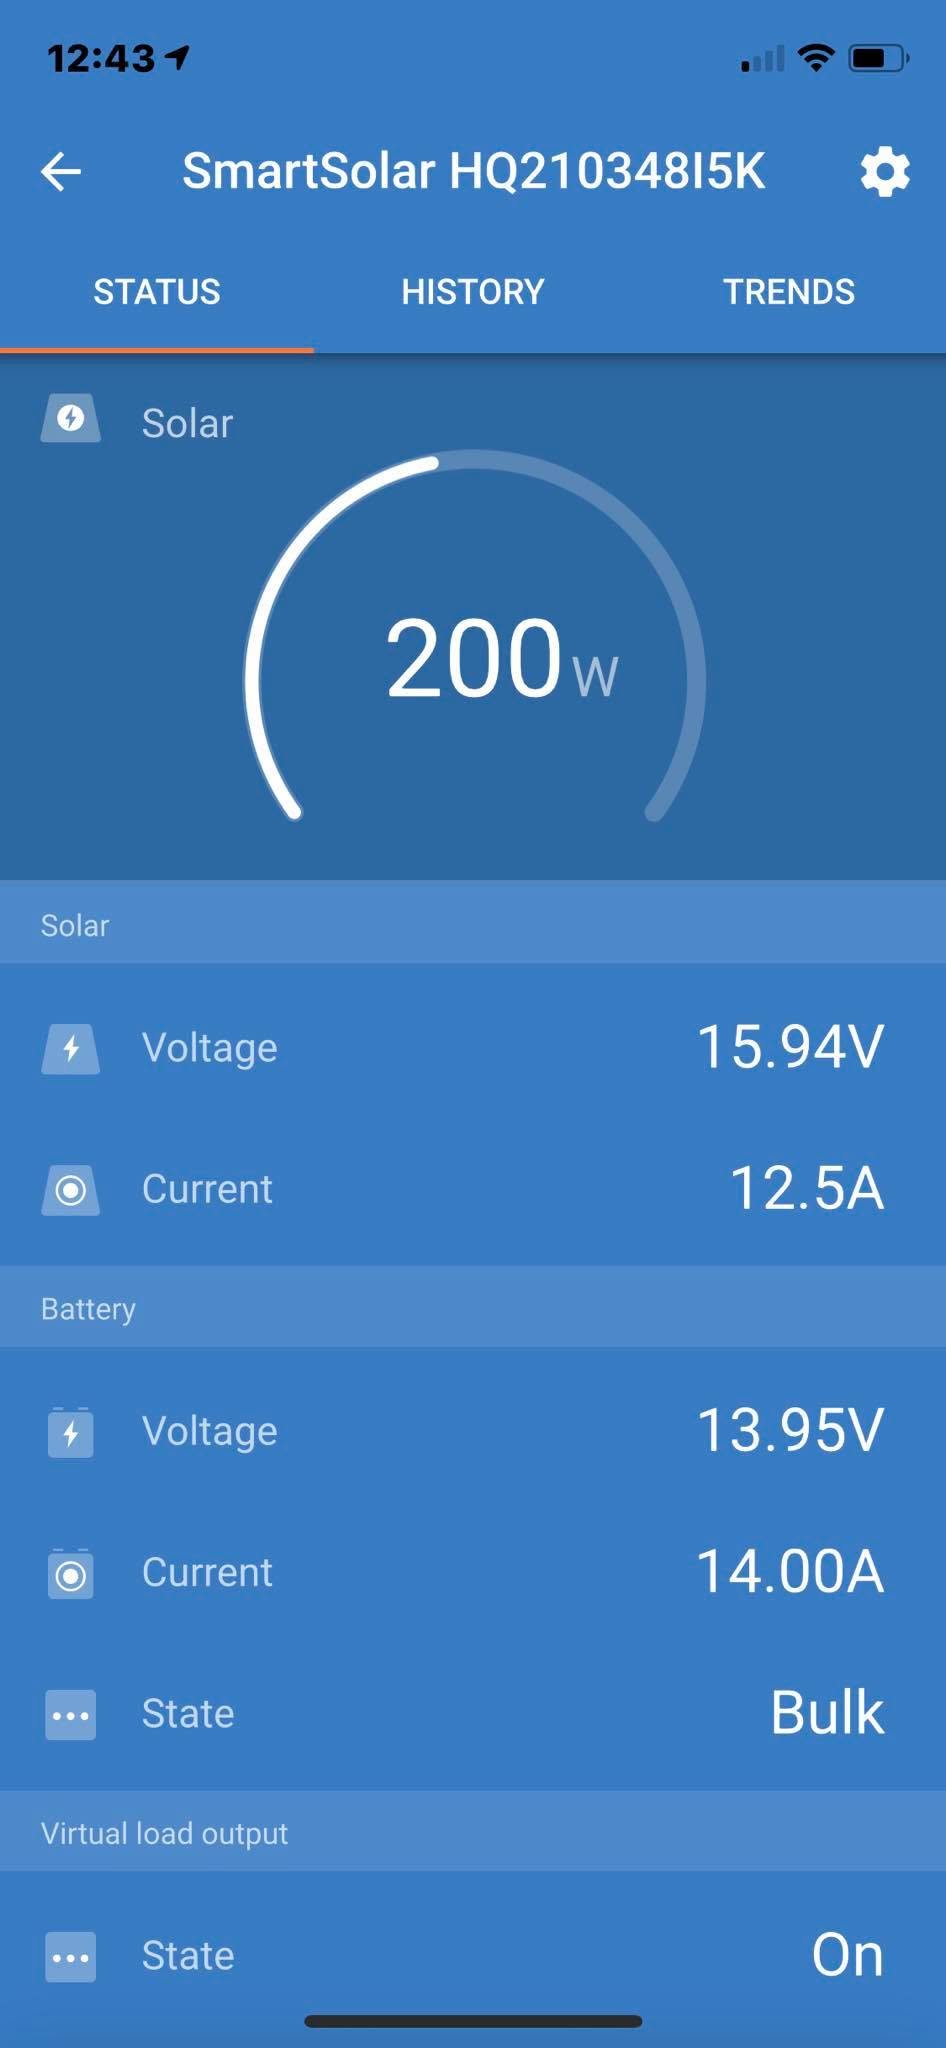
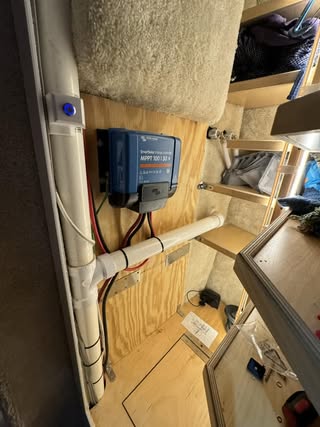
  • Victron SmartSolar 100/30 MPPT controller
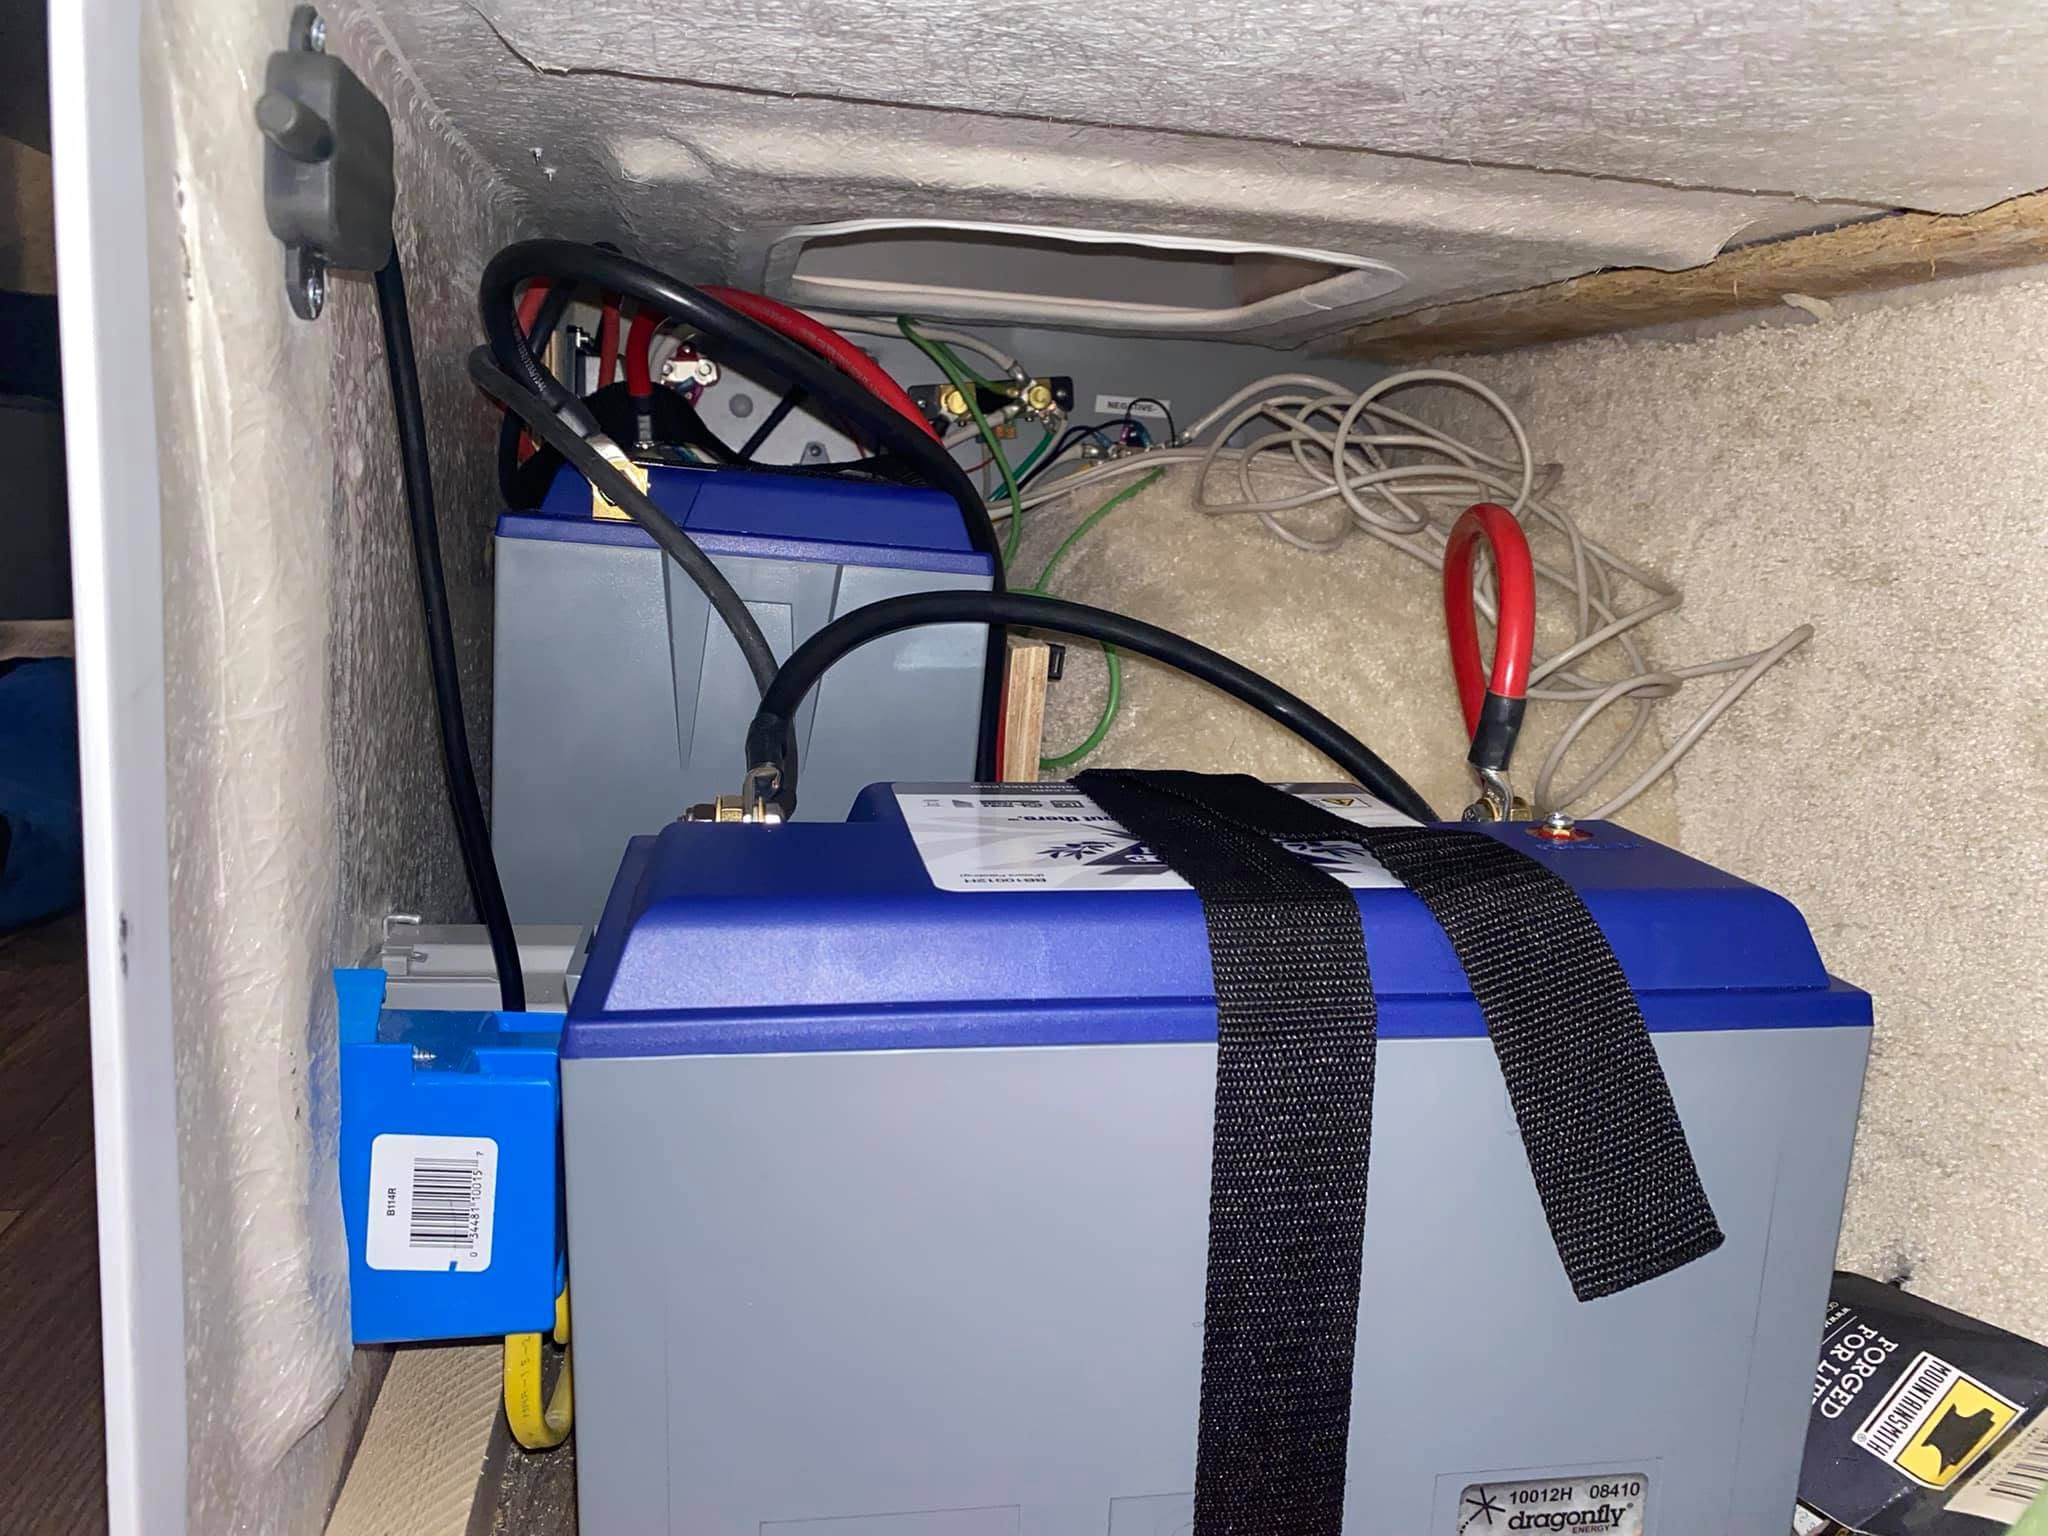
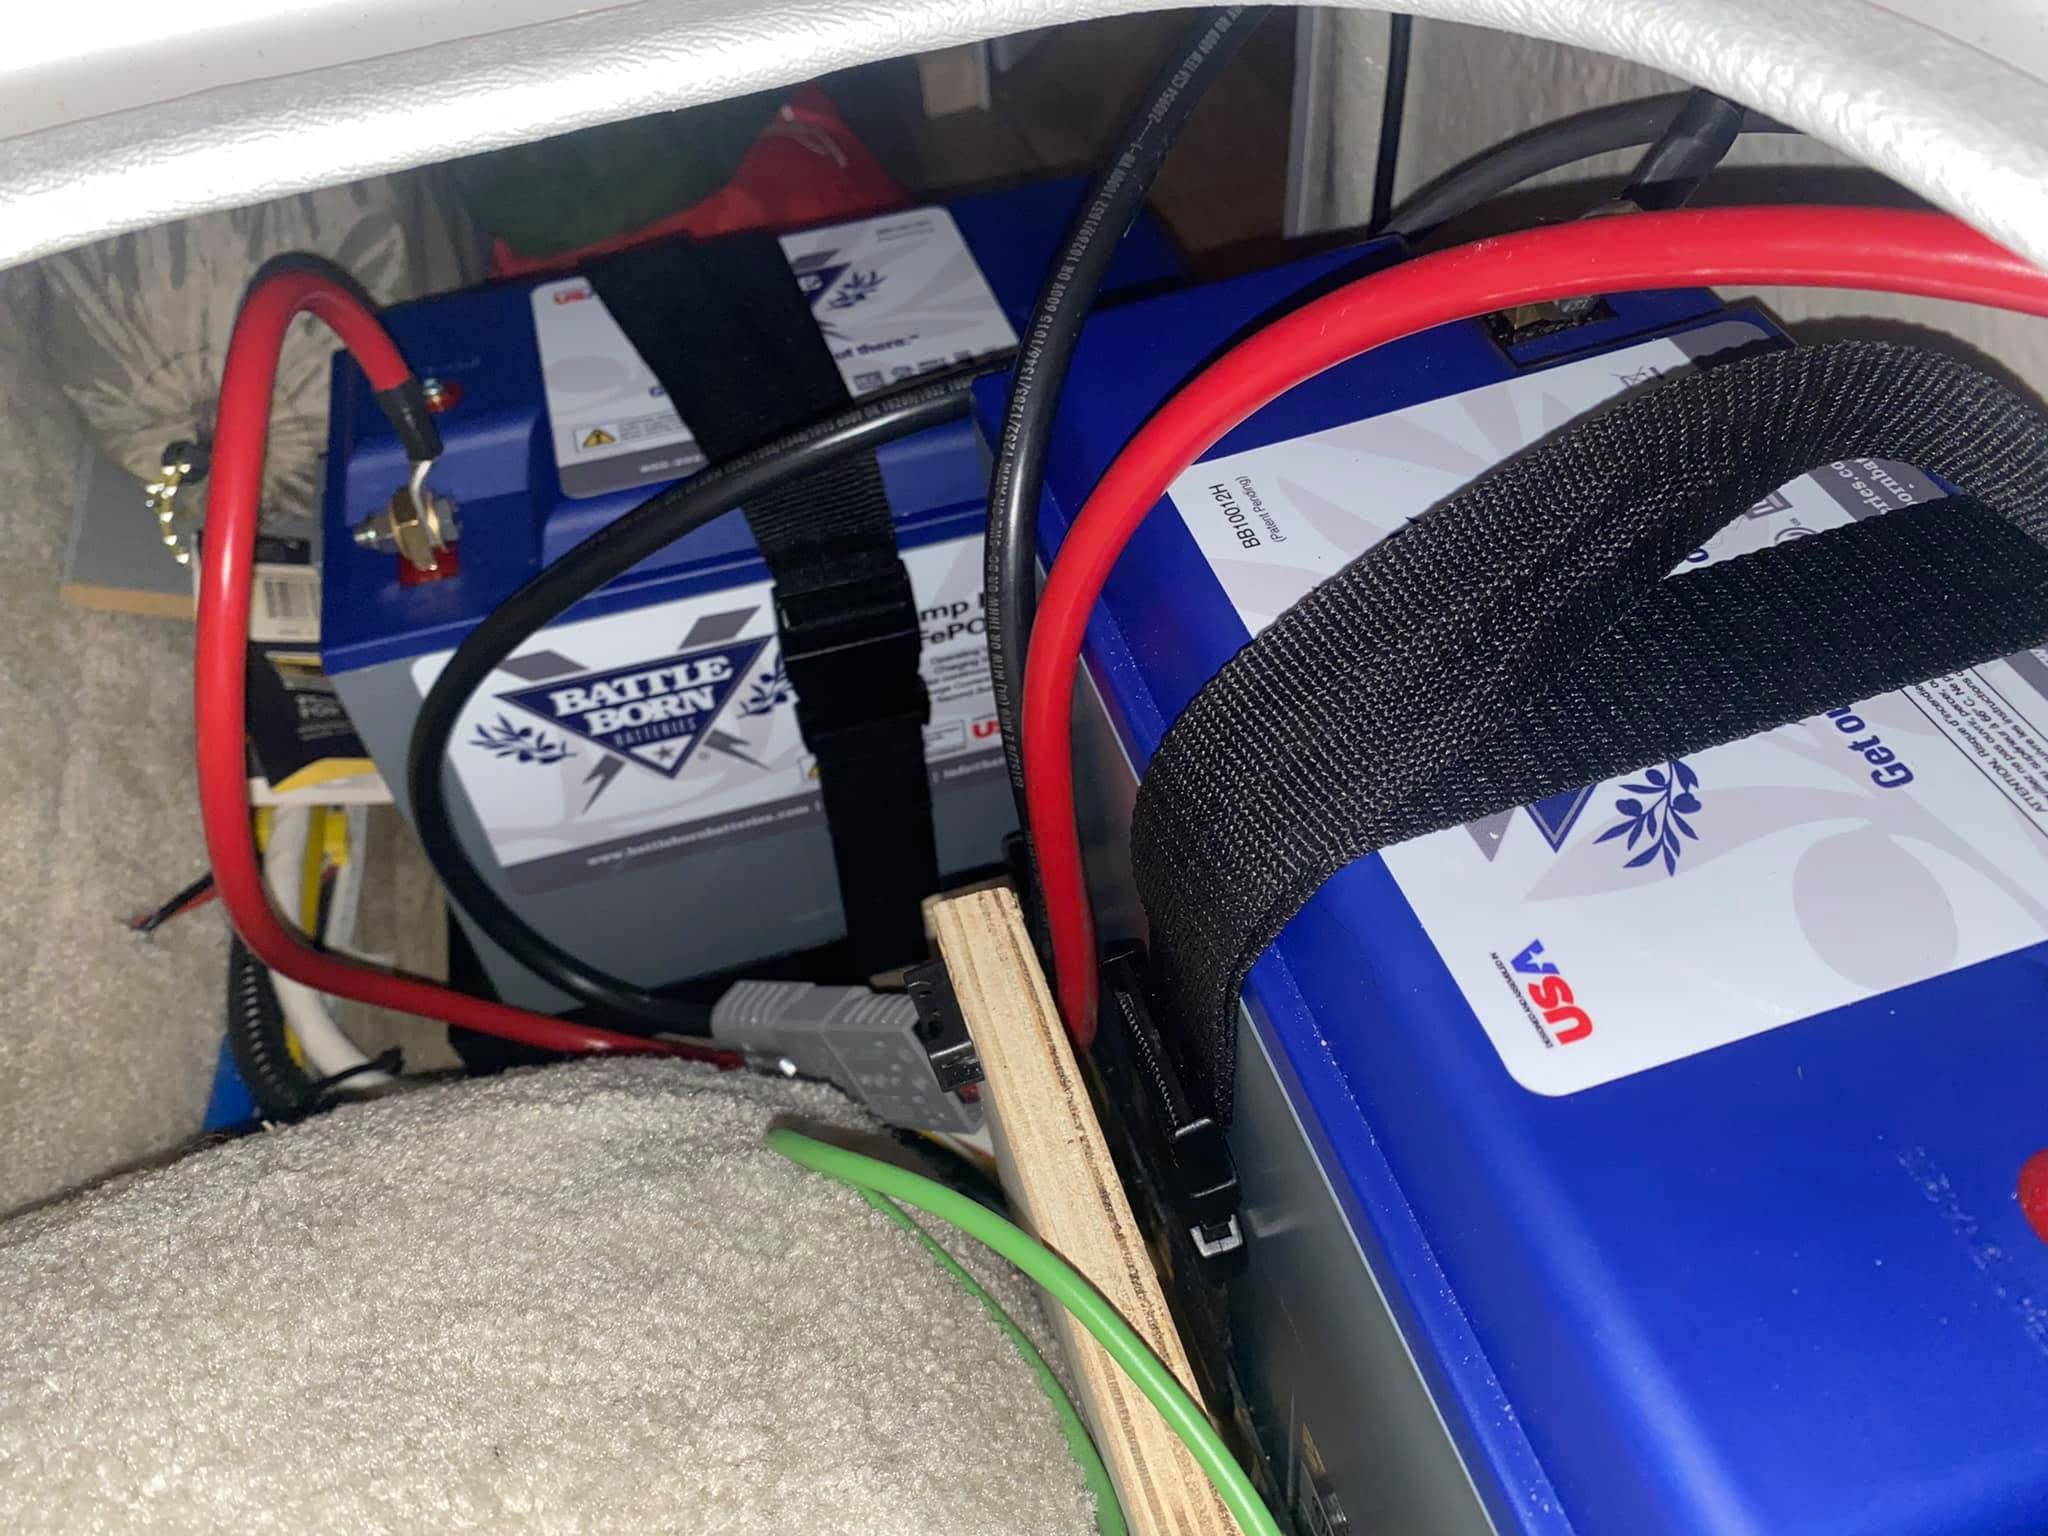
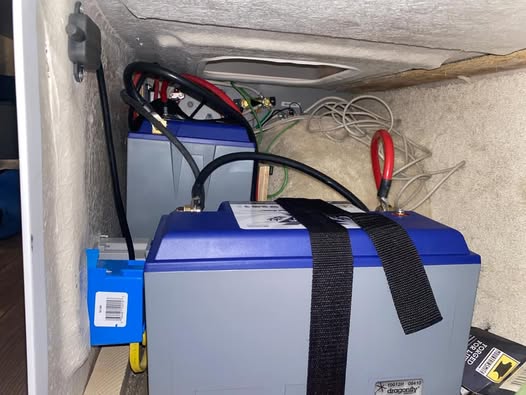
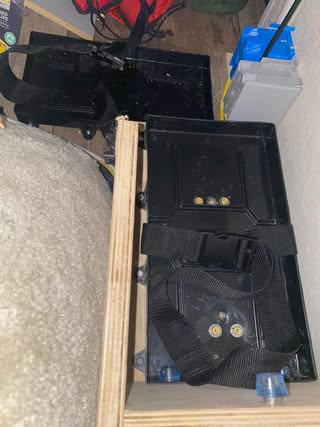
  • 2 x Battleborn 100Ah heated batteries
  • PD 4655L Wildkat converter
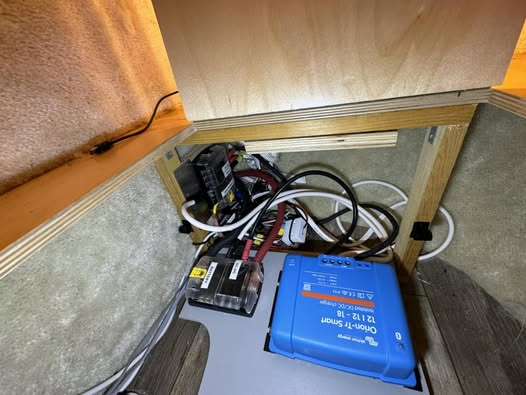
  • Victron Orion Tr Smart 12|12|18A DC-DC charger
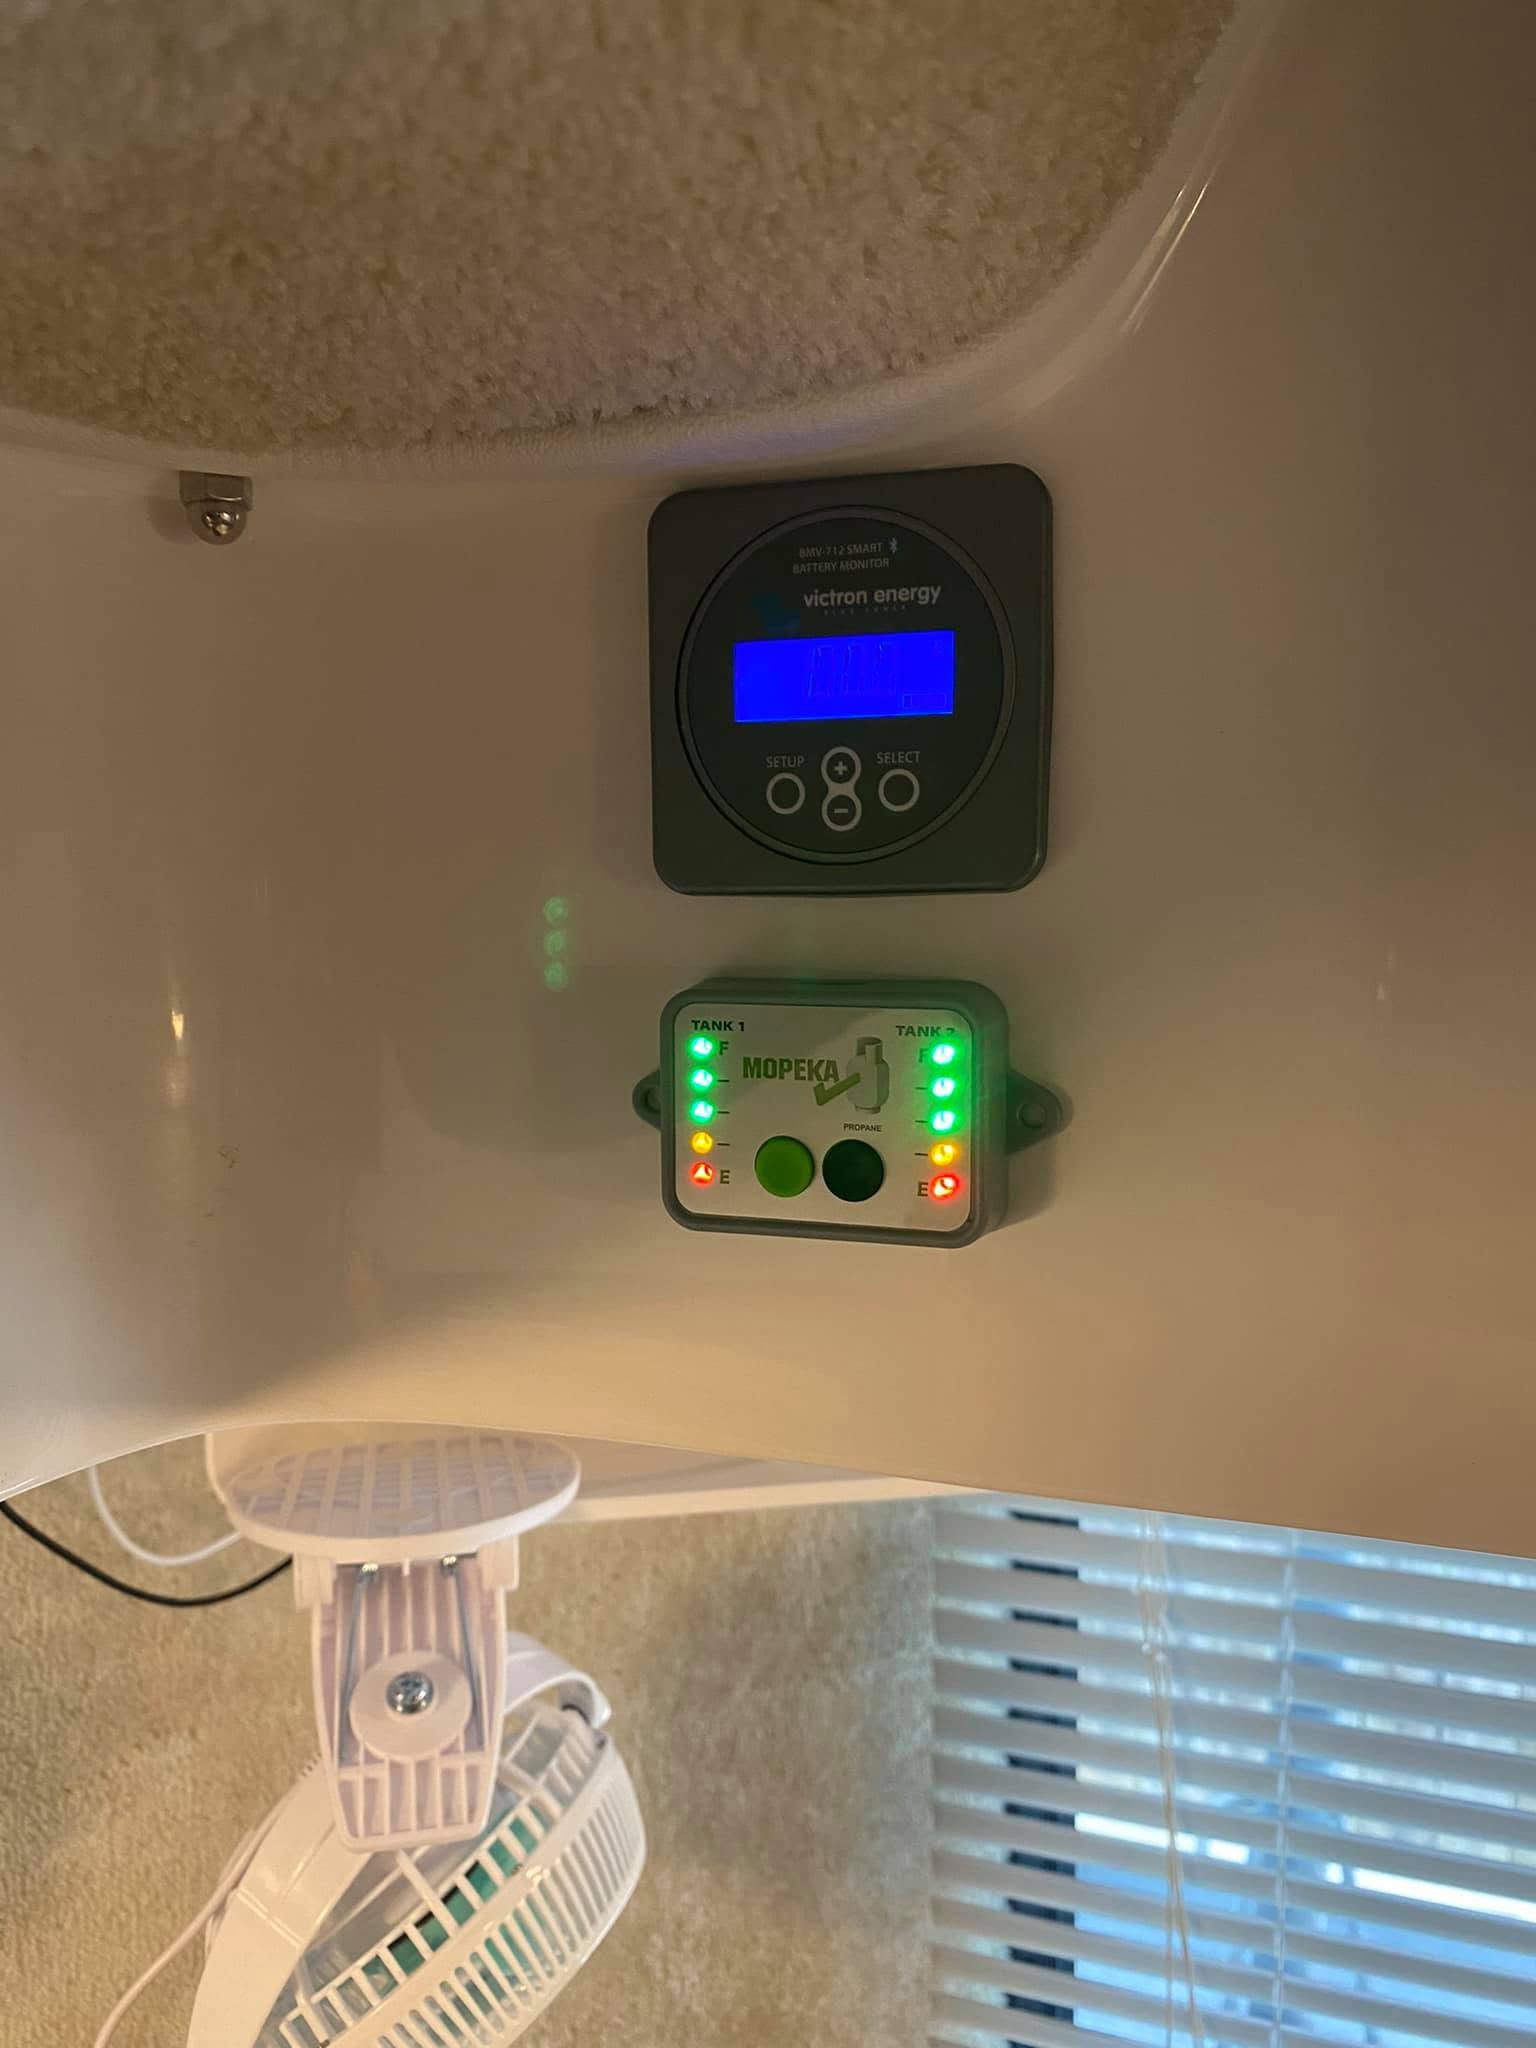
  • Victron BMV-712 battery monitor

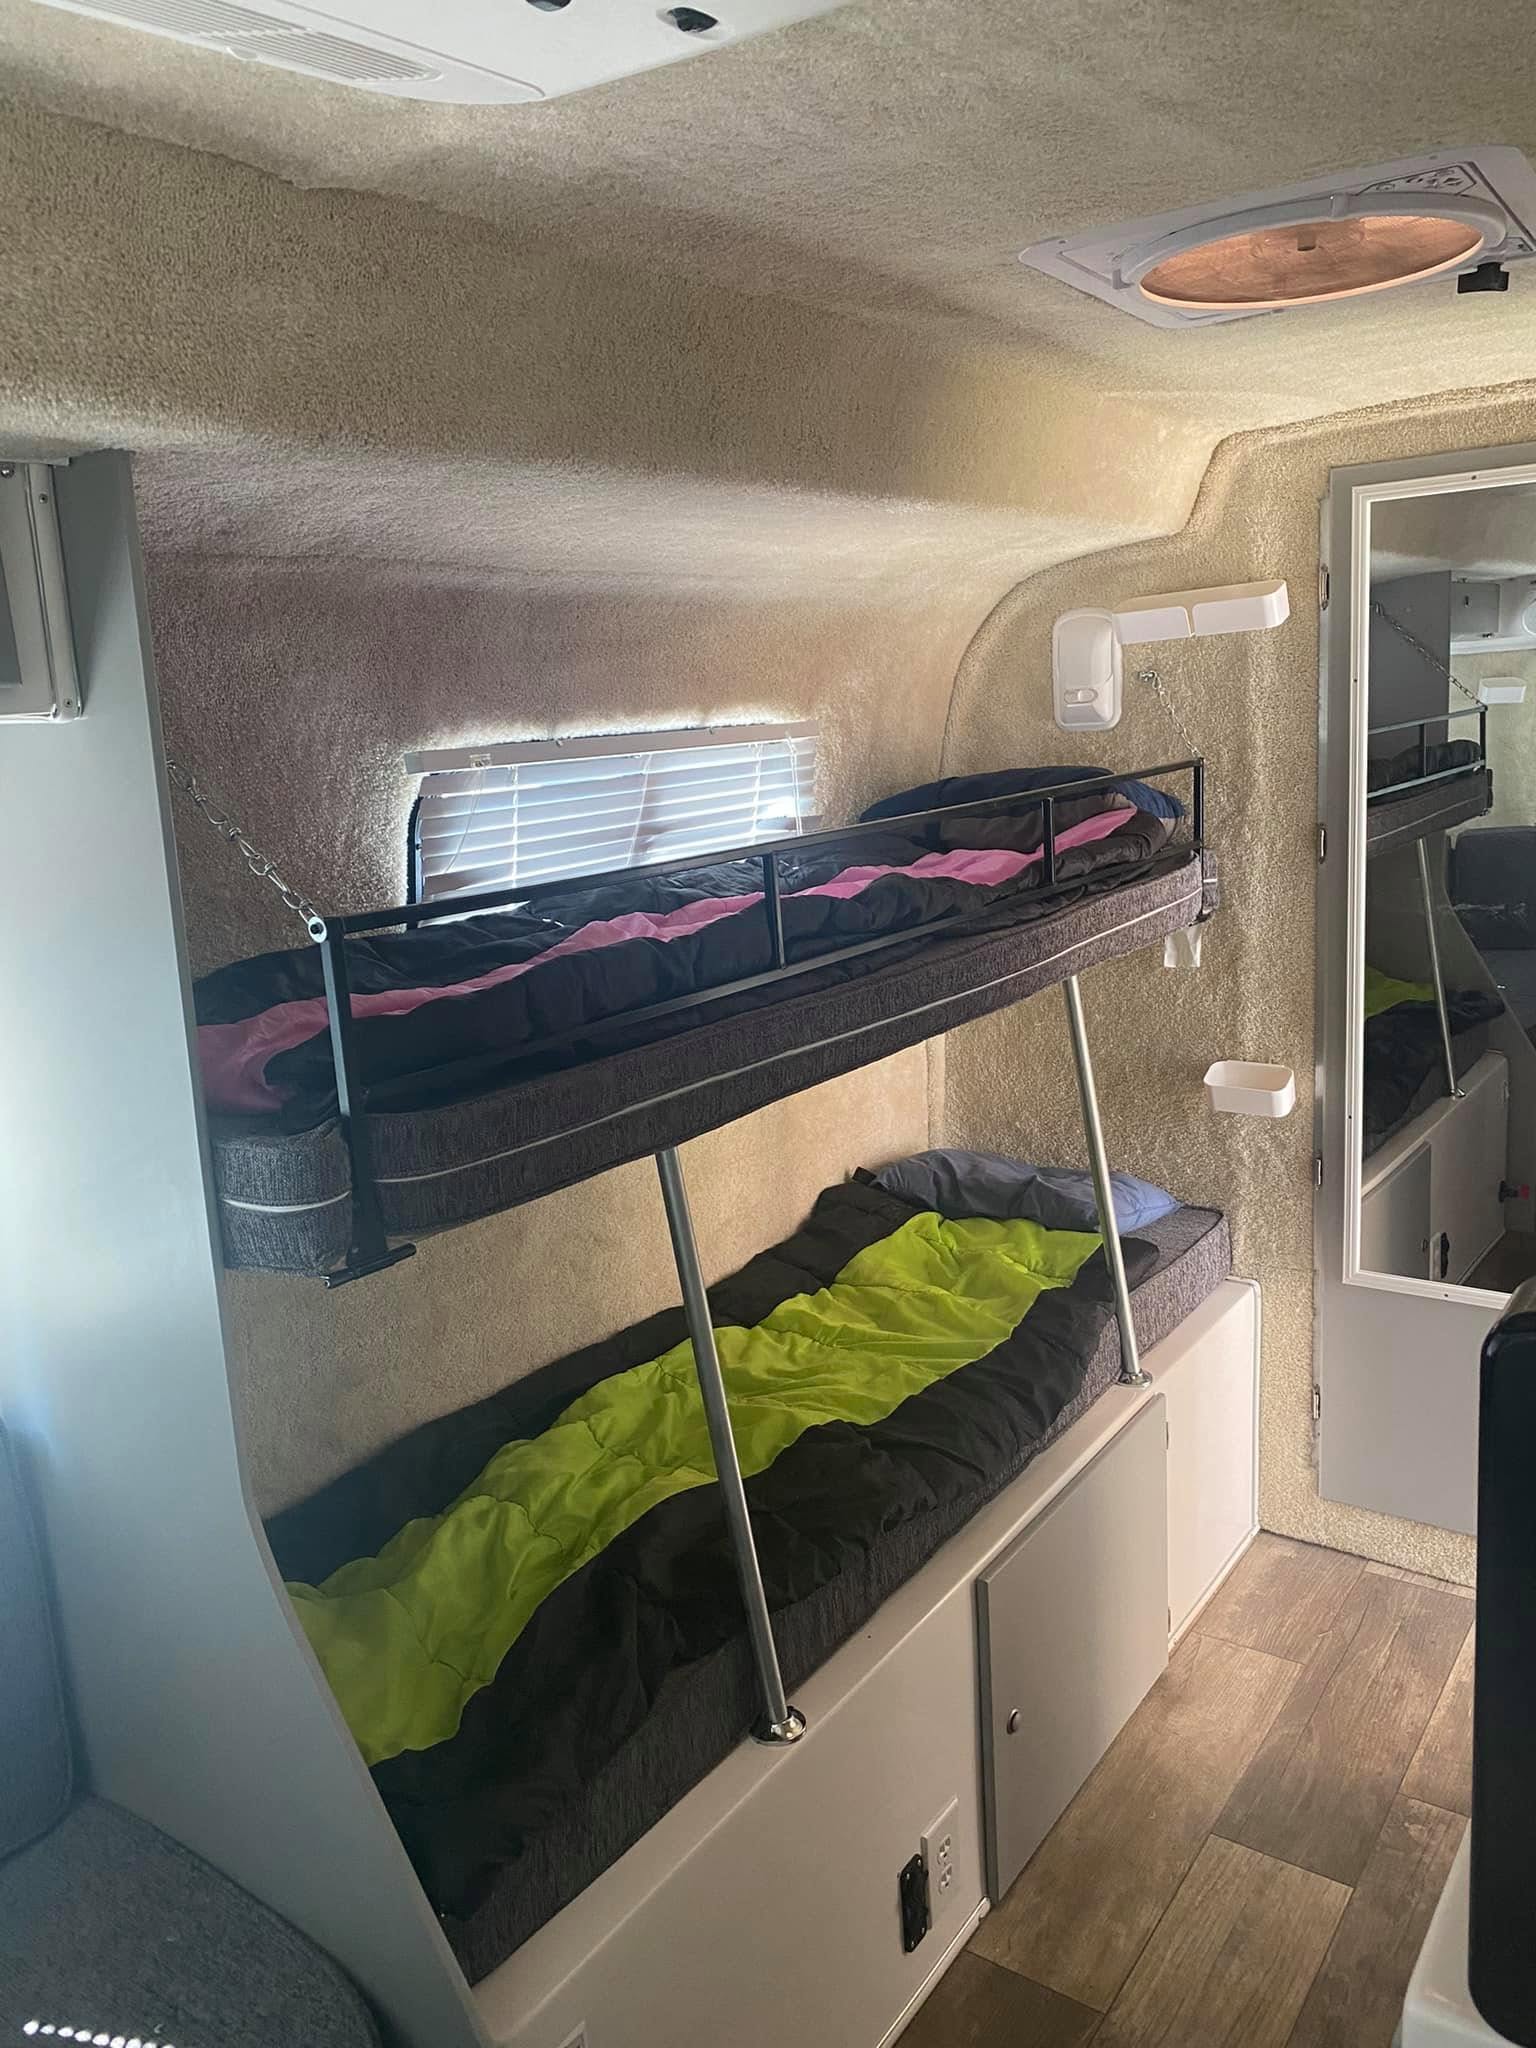
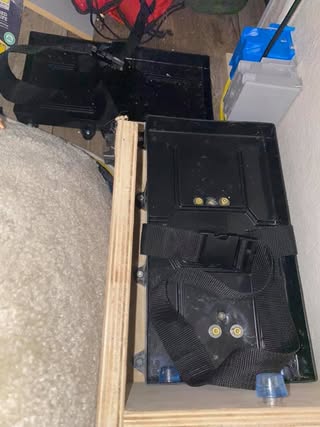
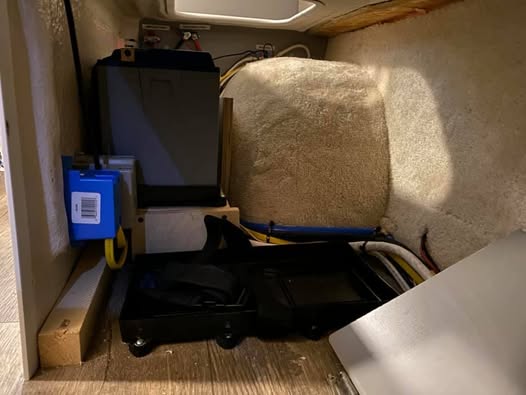
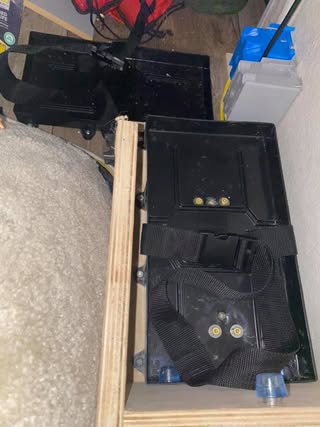
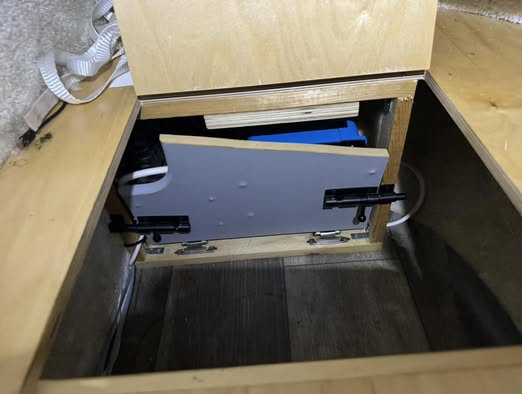
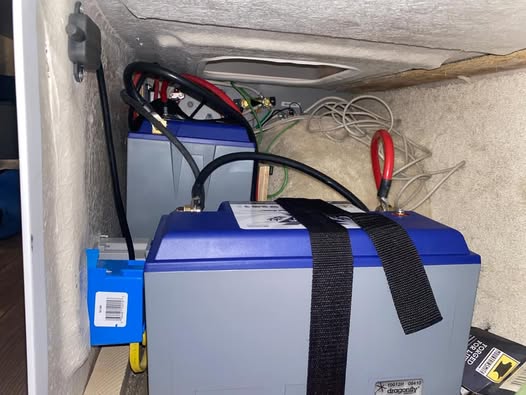
Because of the massive space under the bunks of our Heritage Deluxe, I was able to create some mounts for both batteries under the bunk beds.

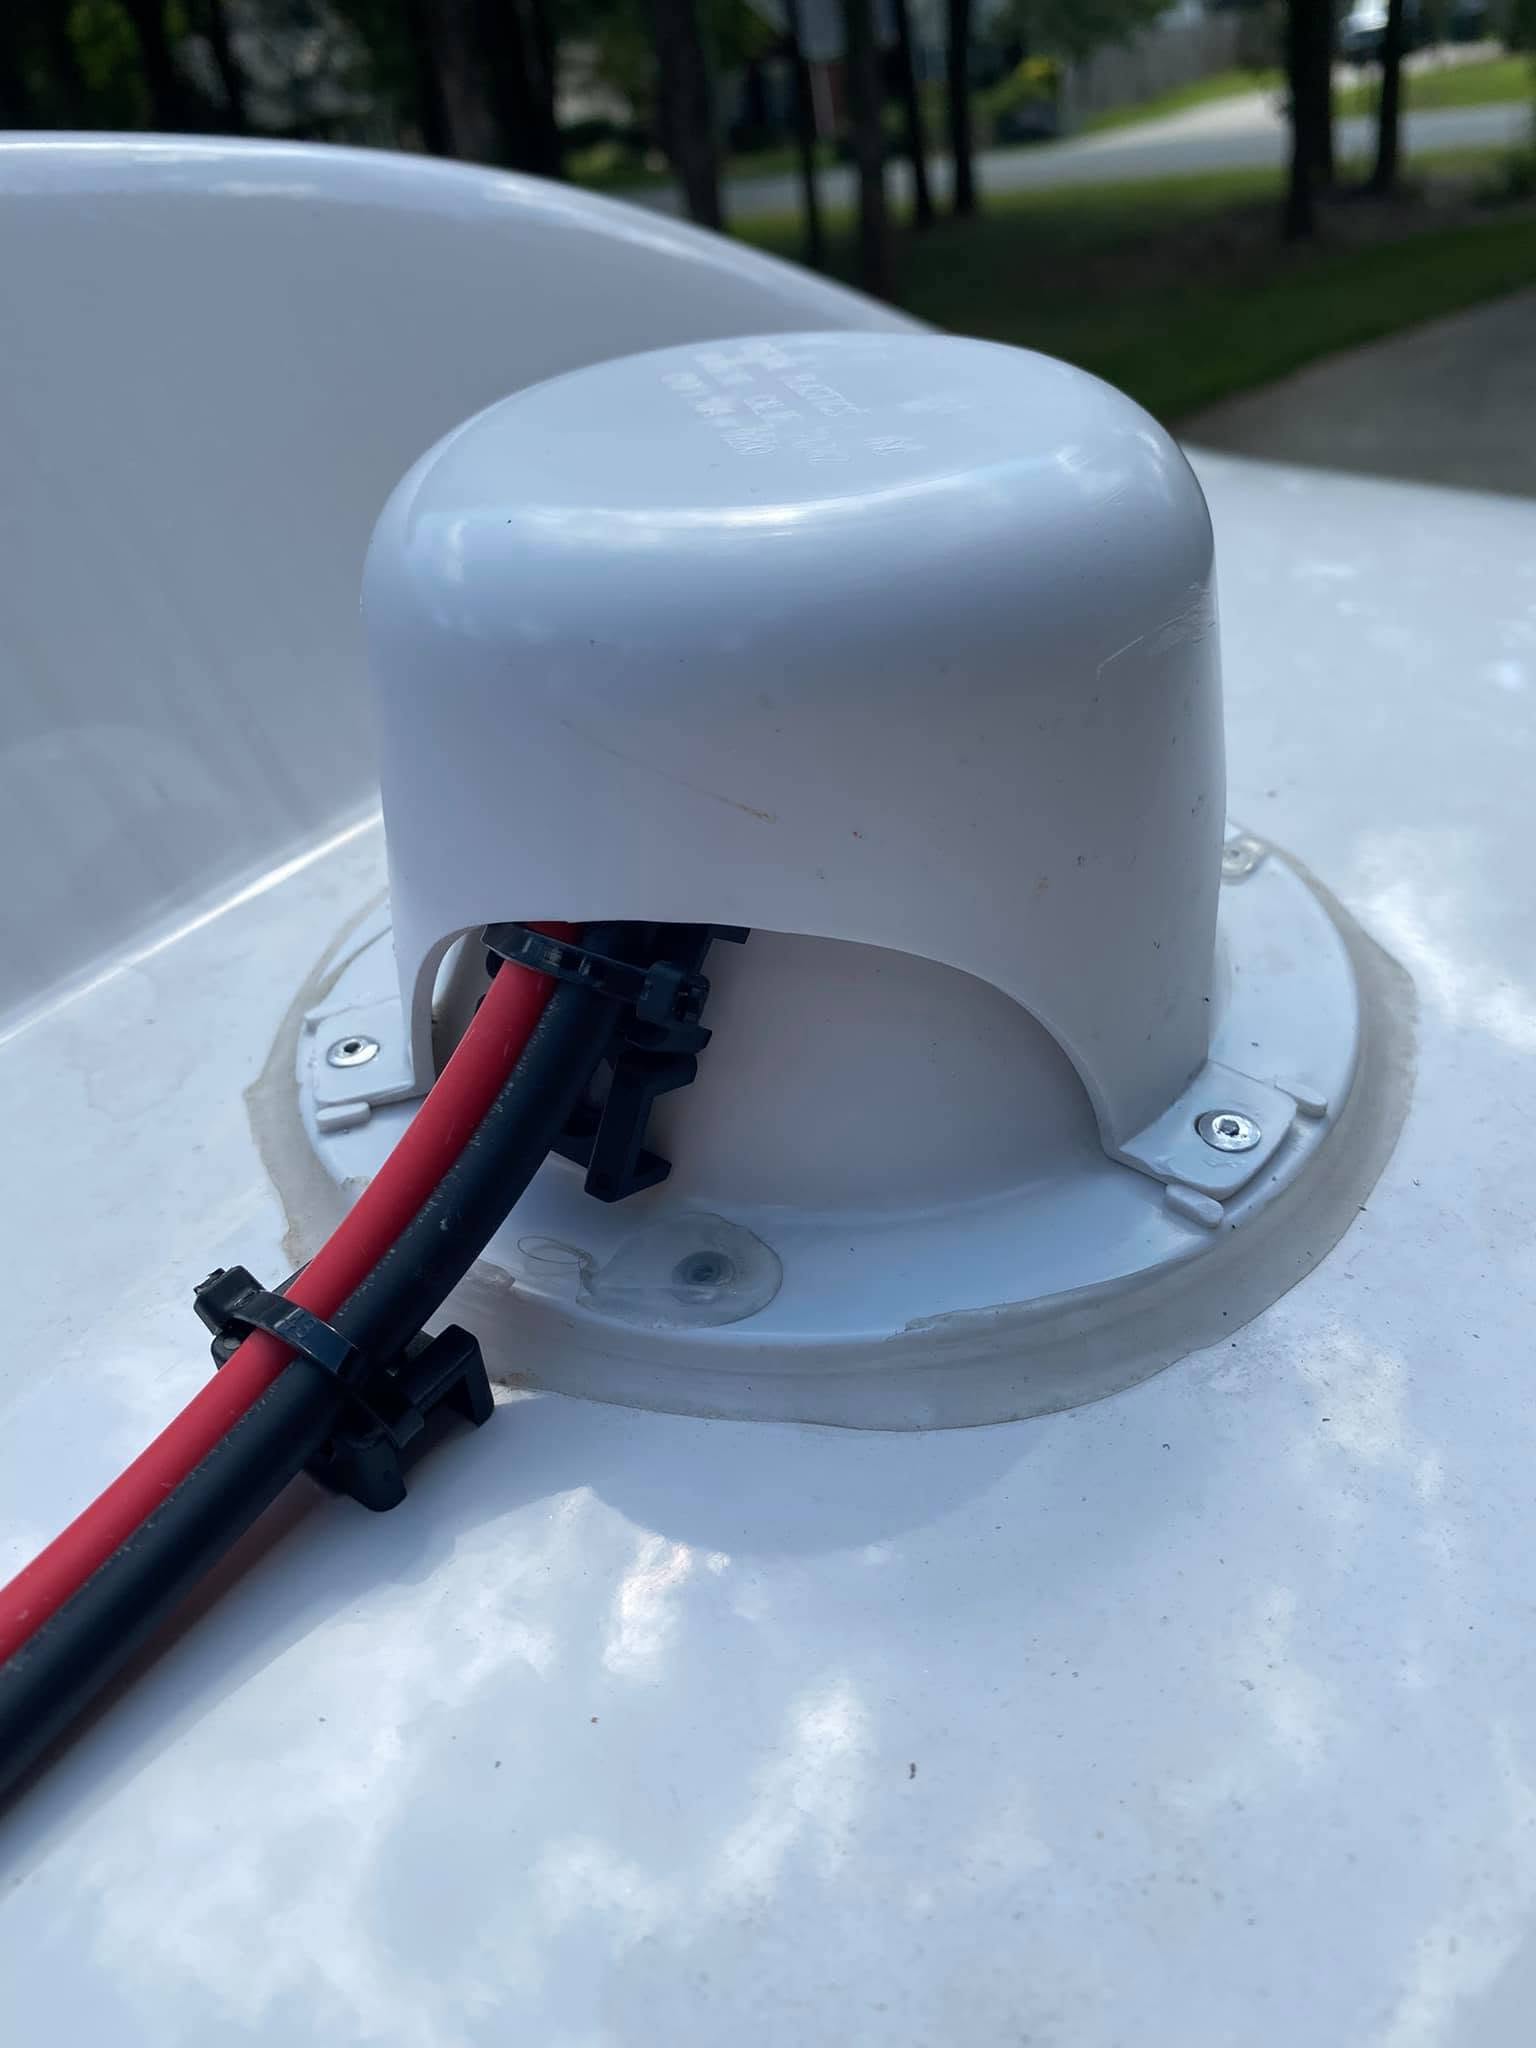
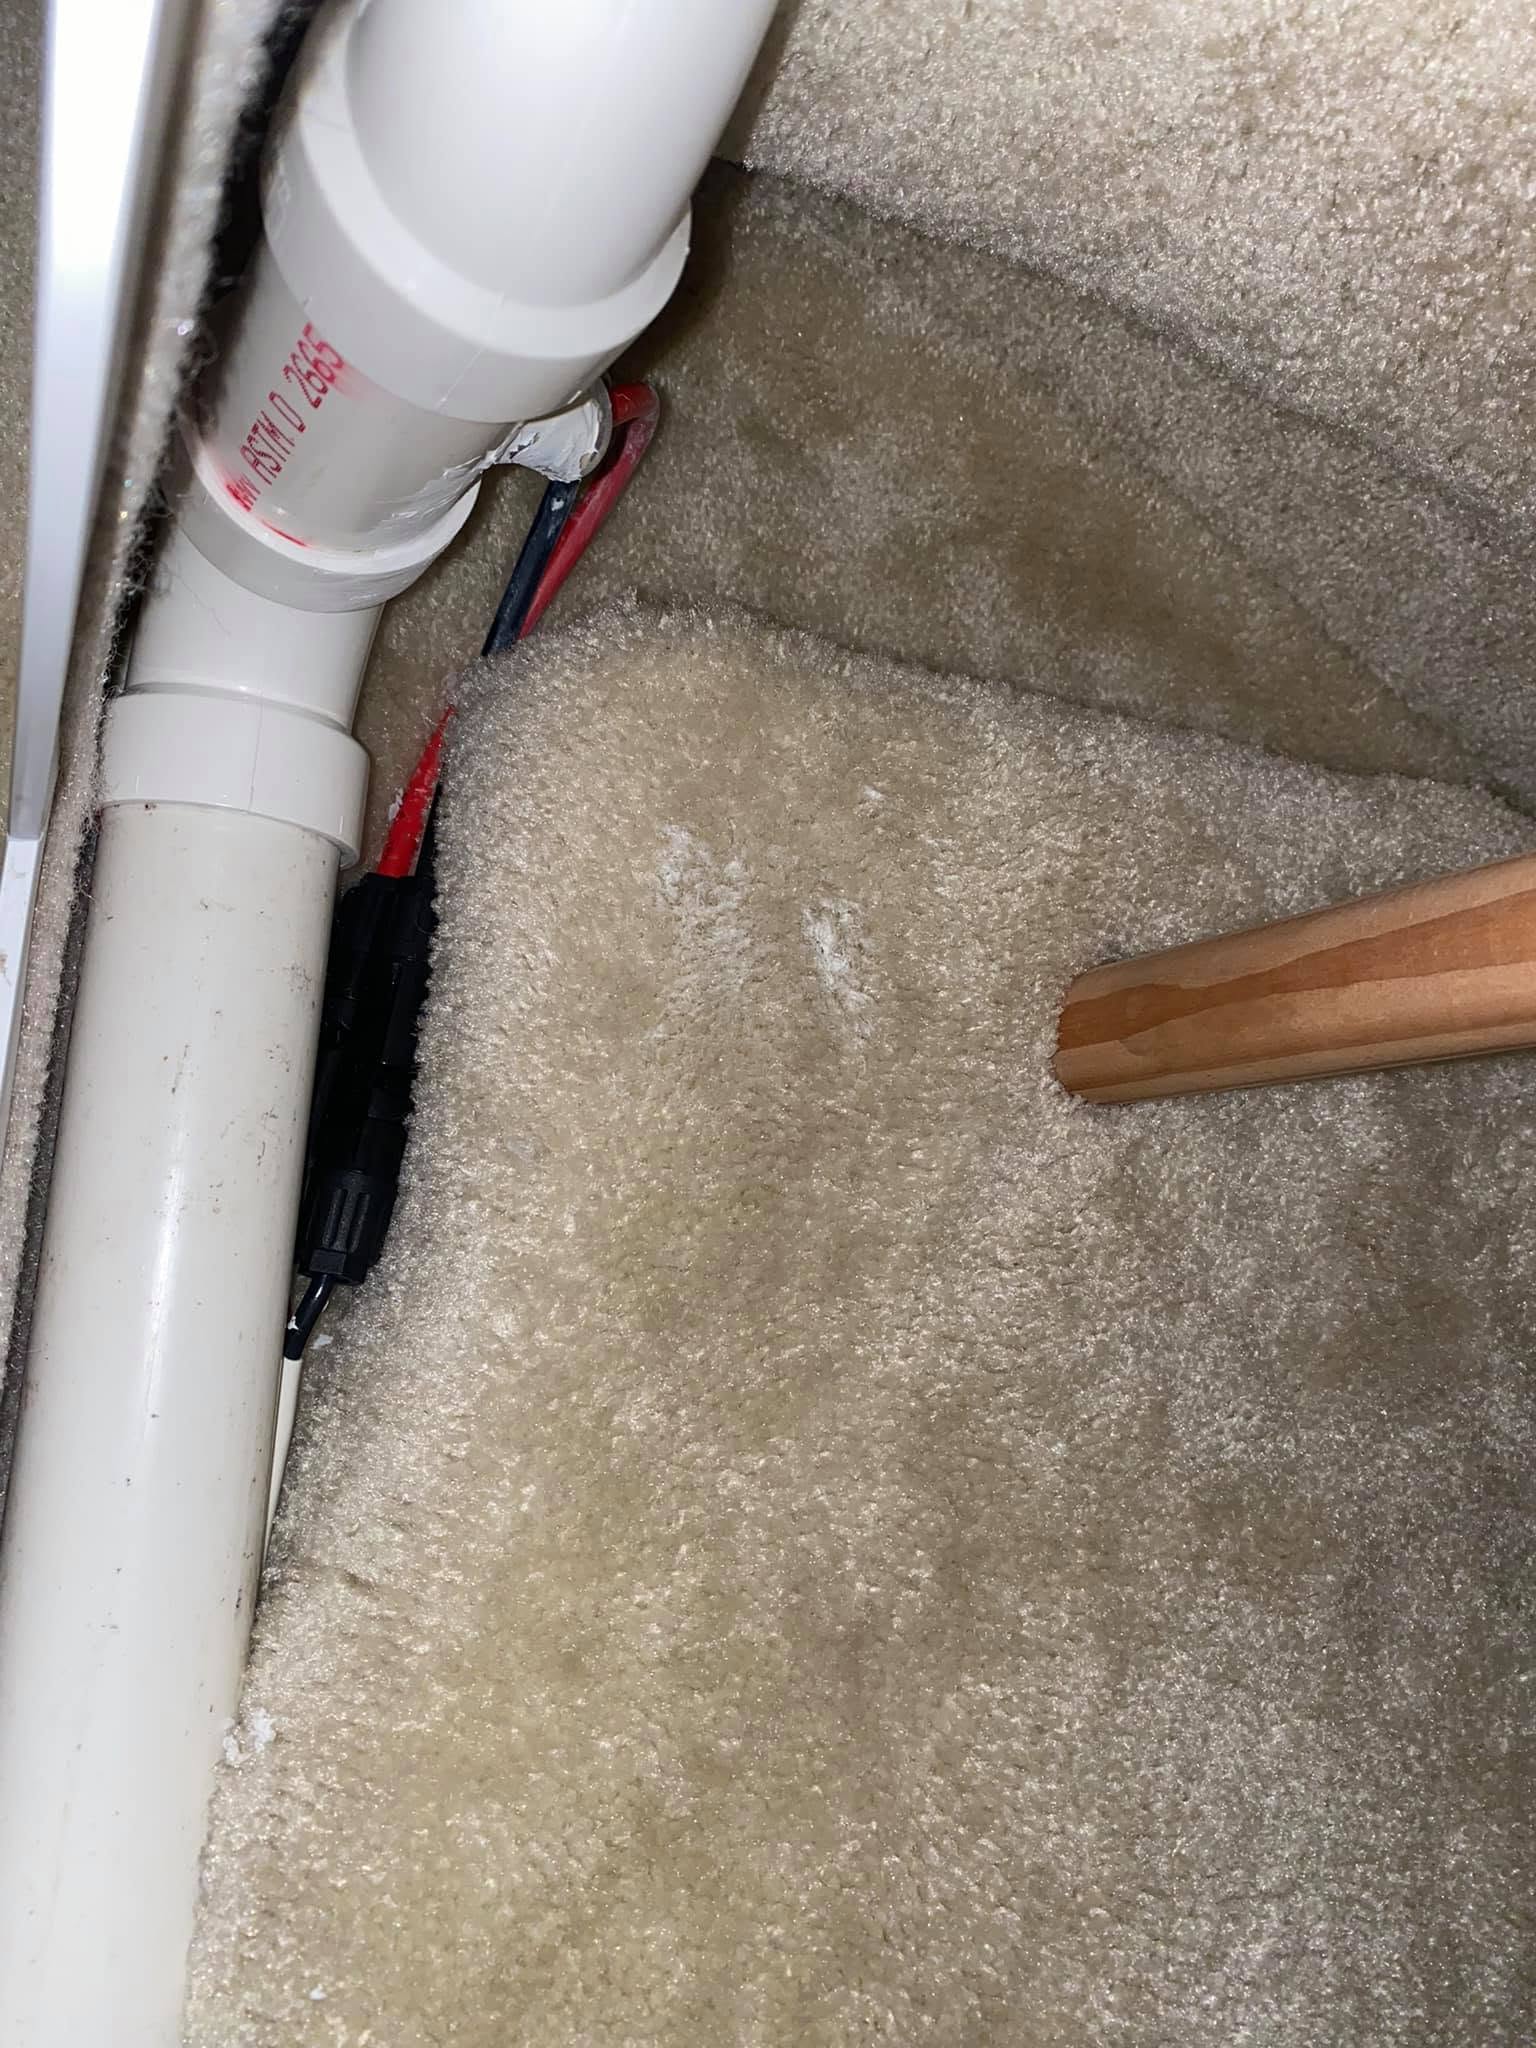
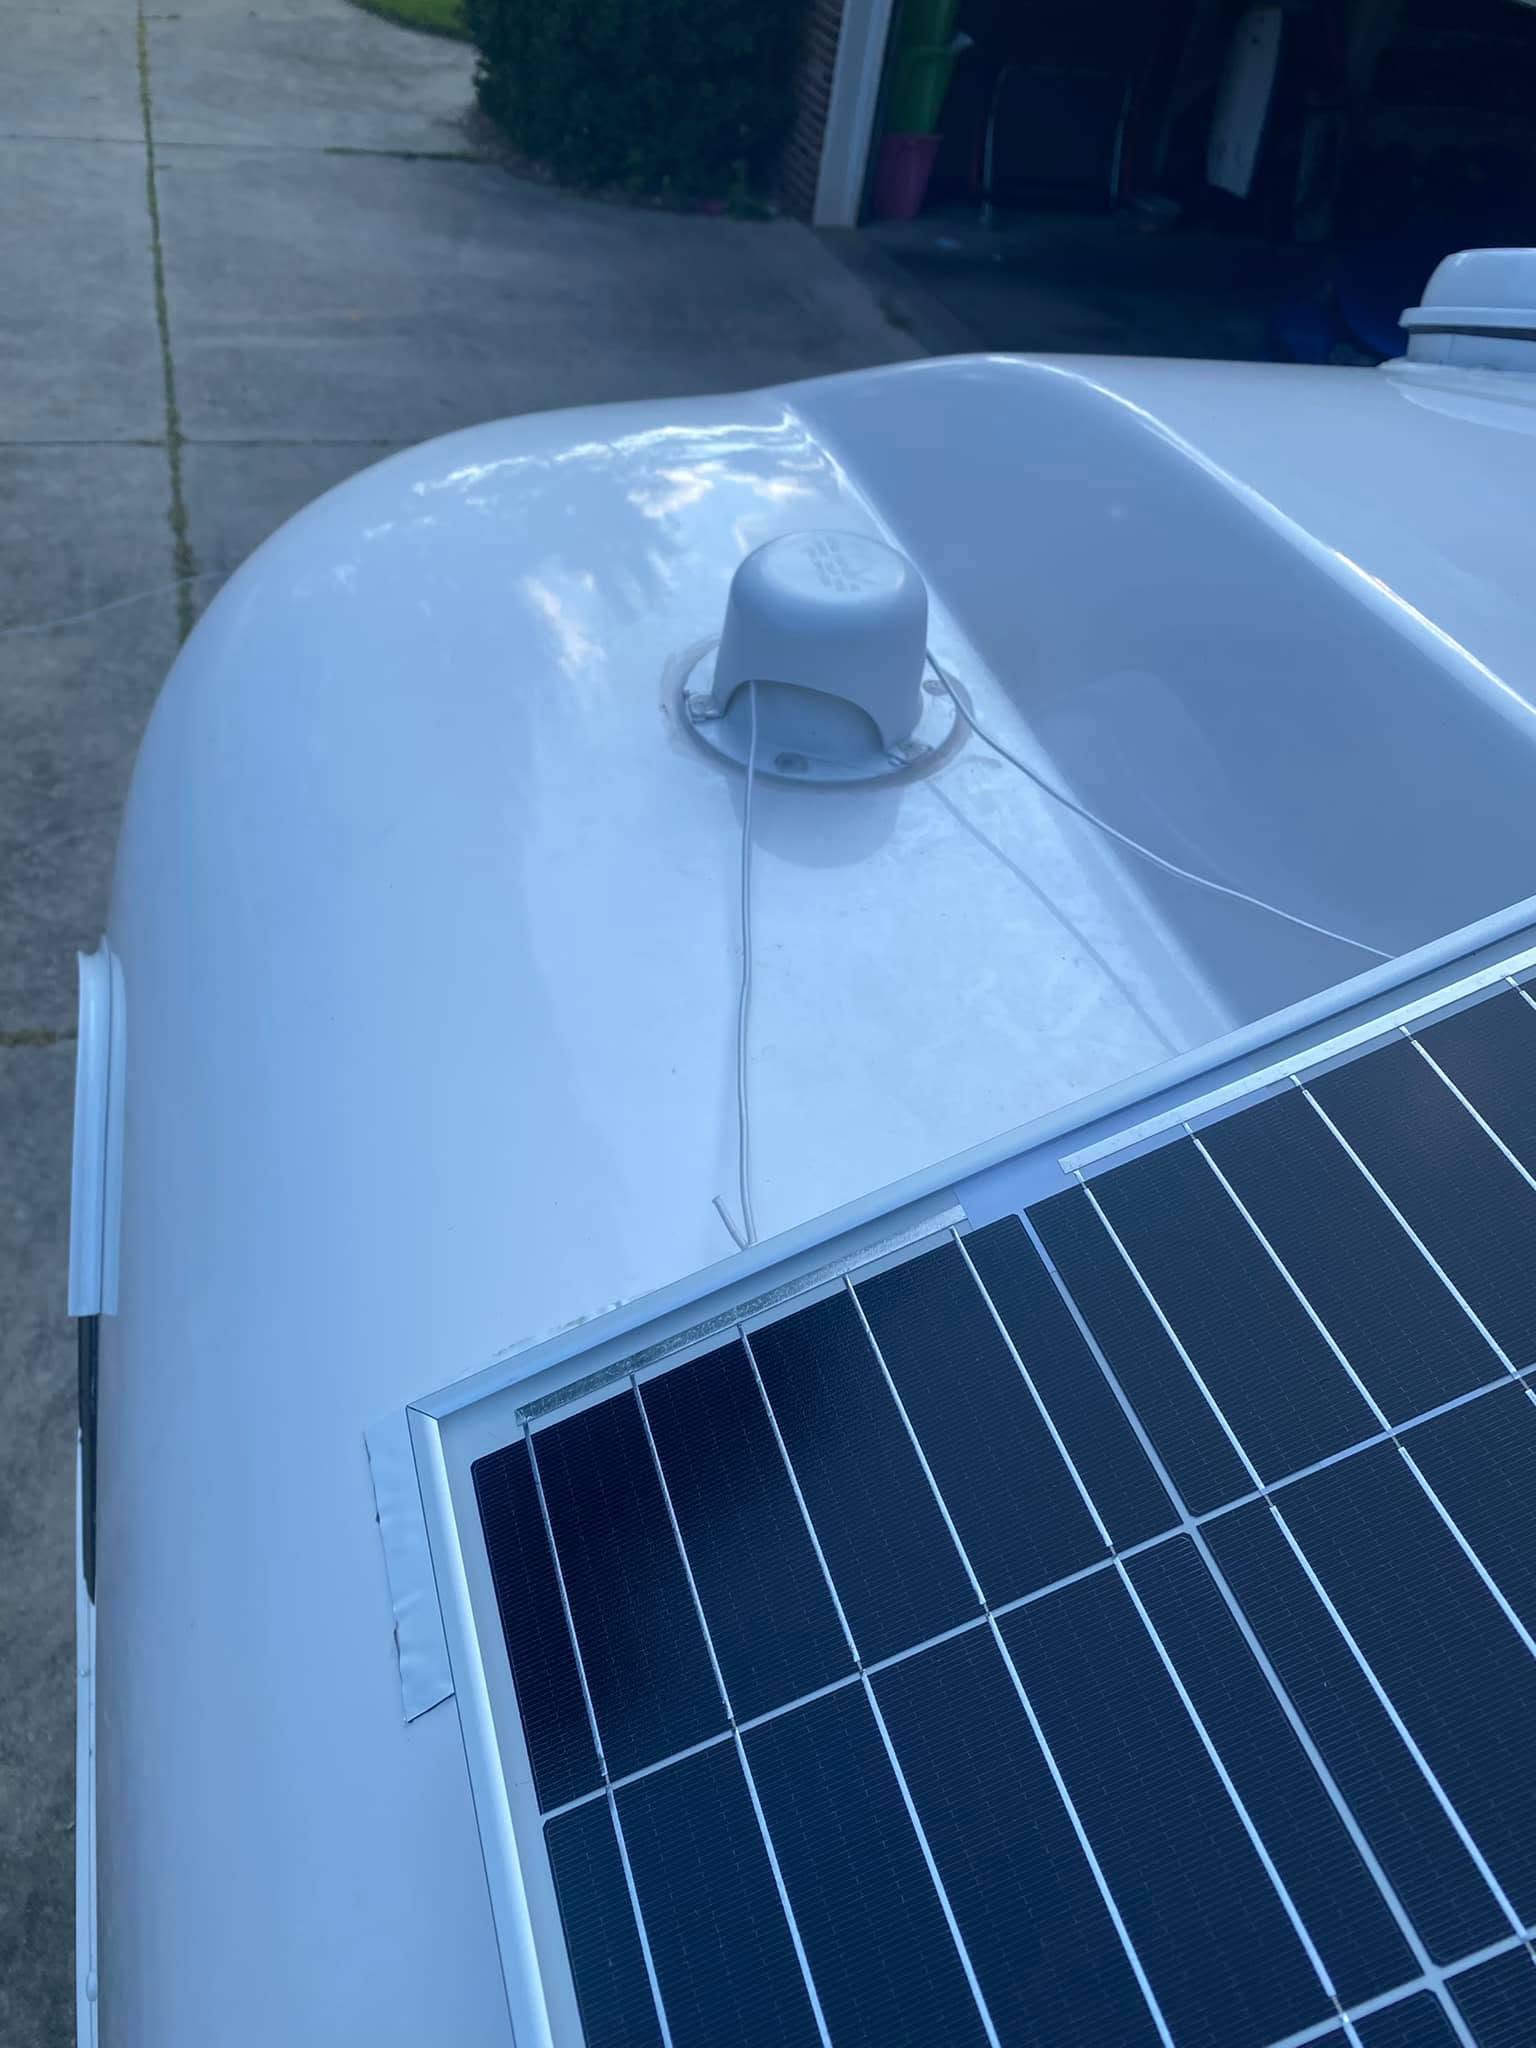
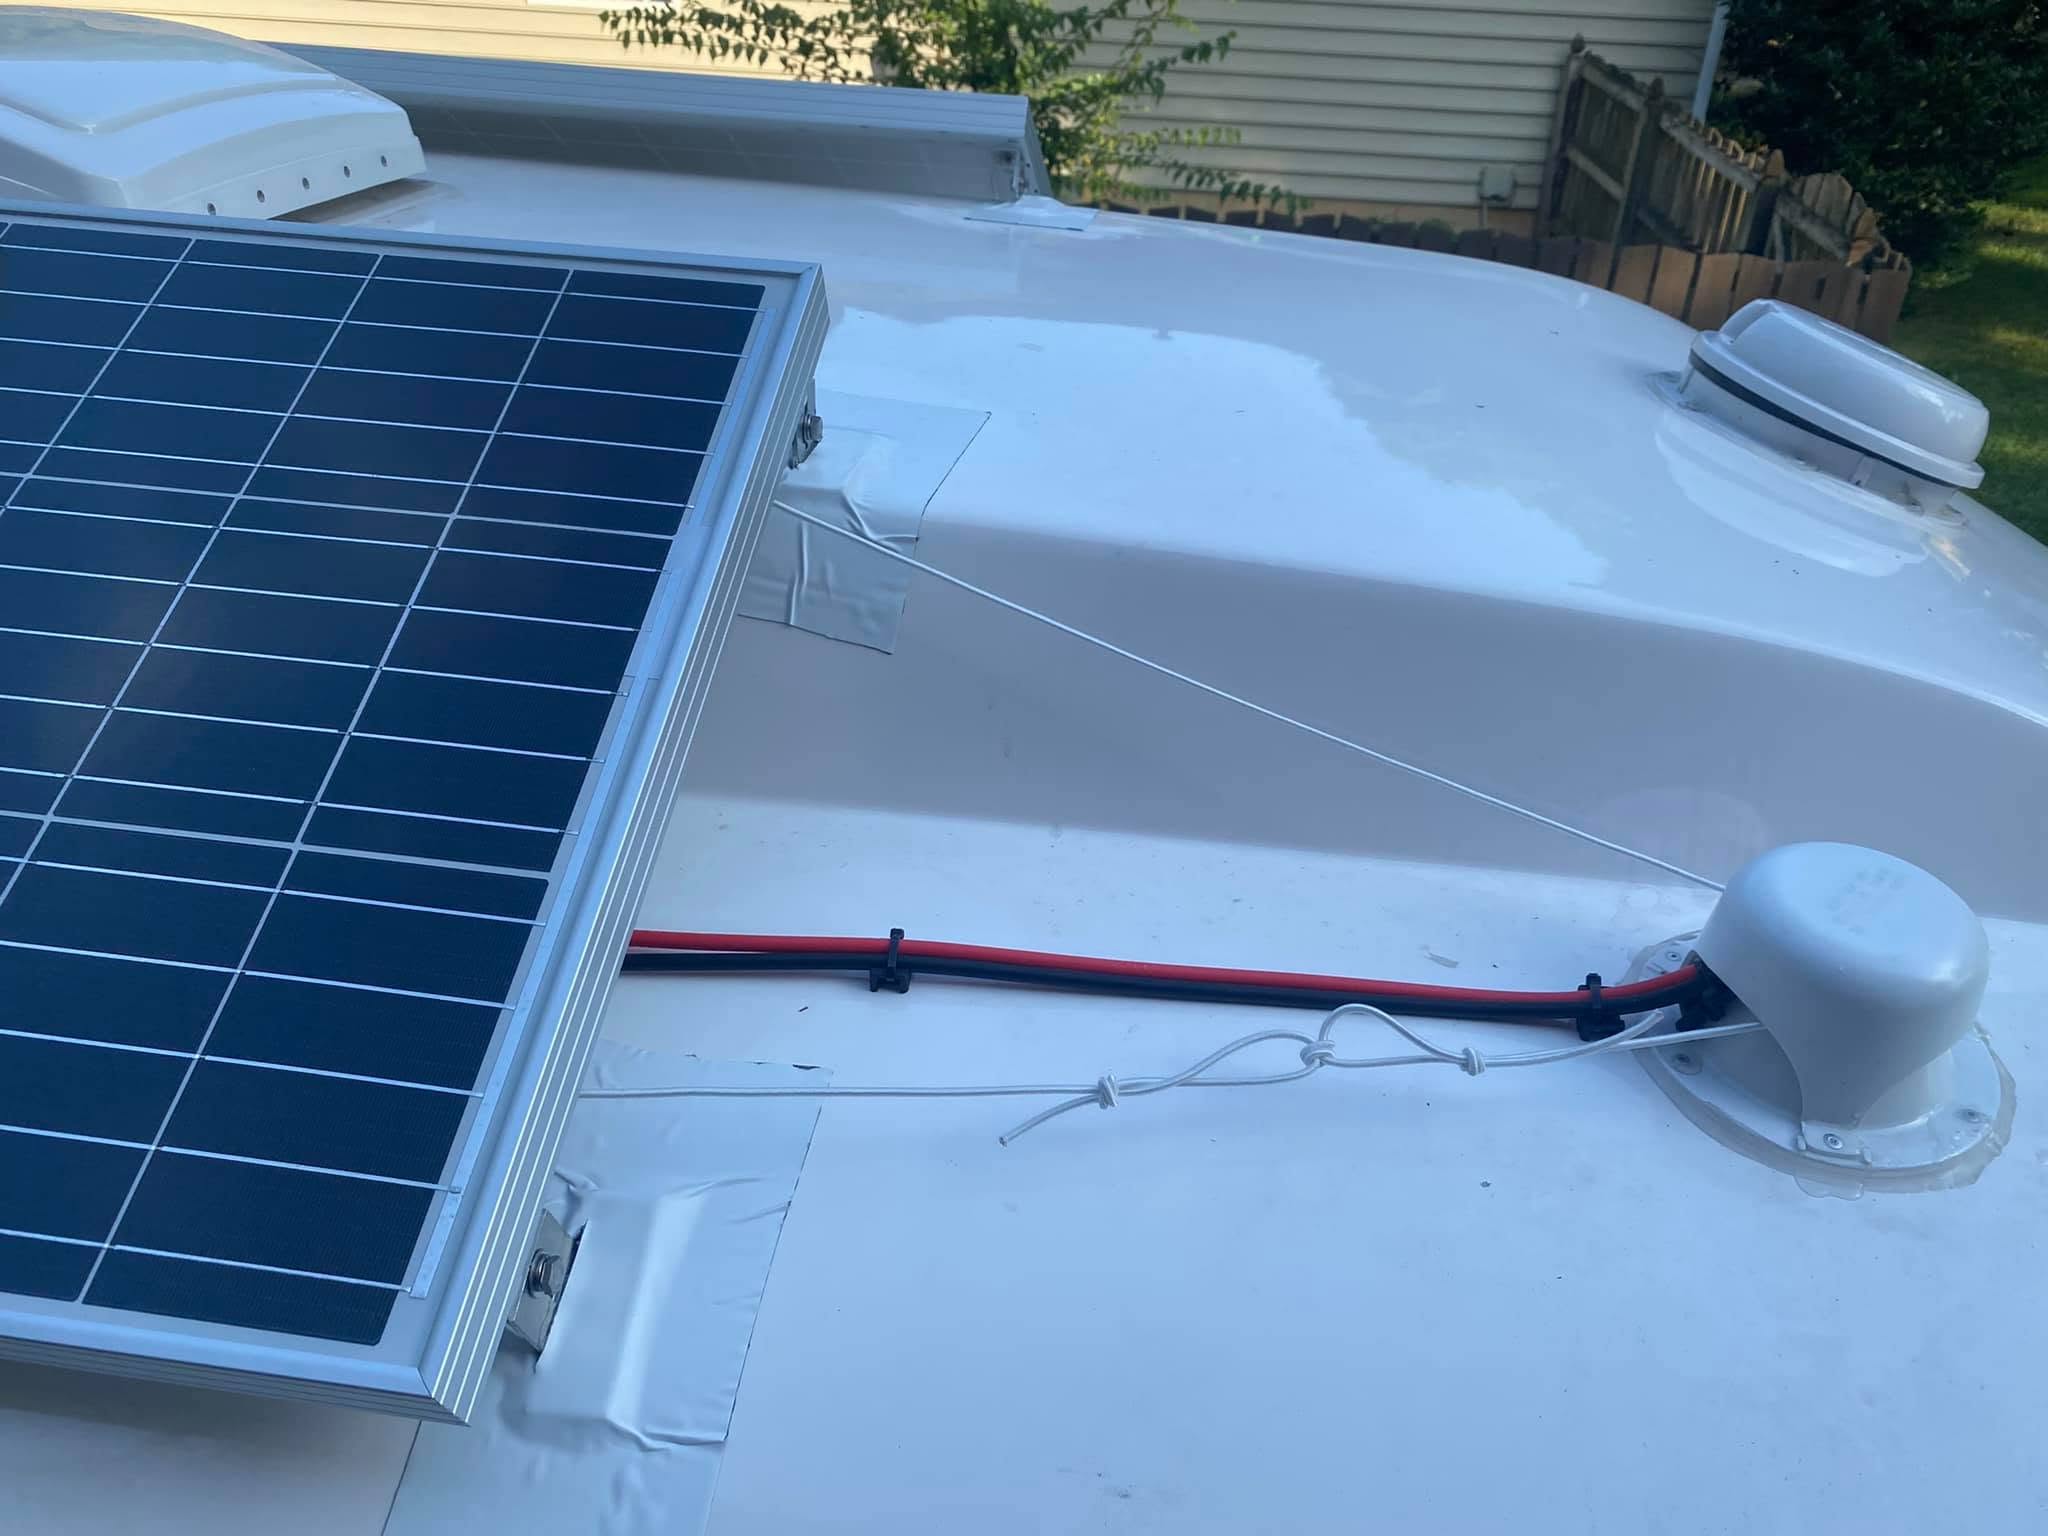
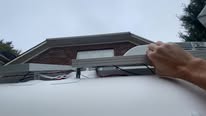
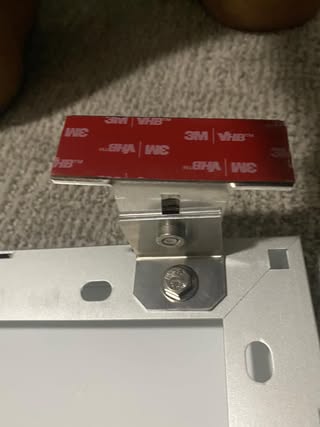
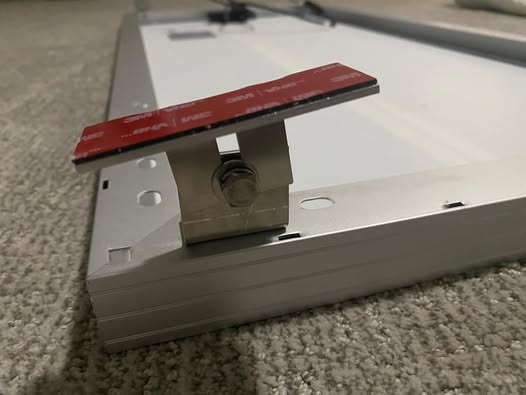
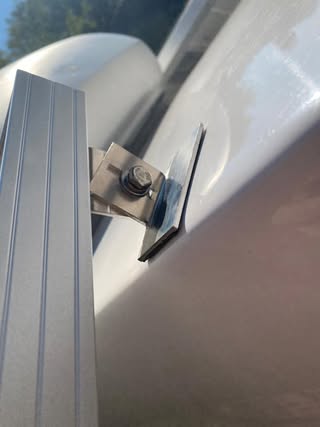
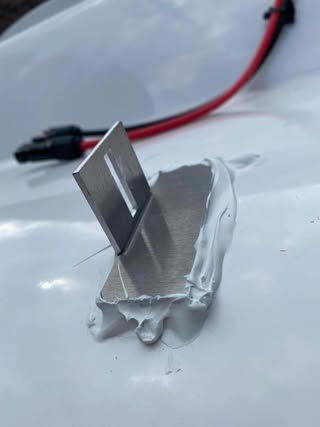
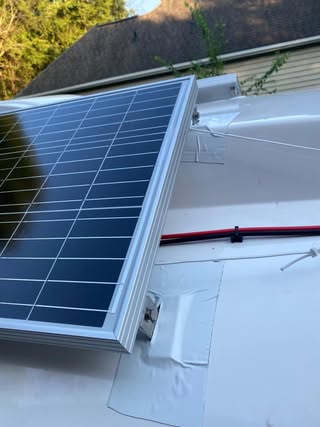
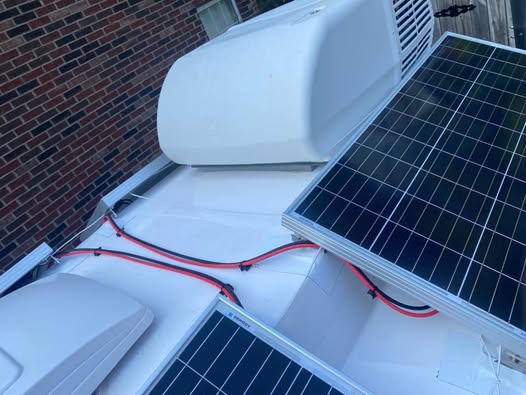
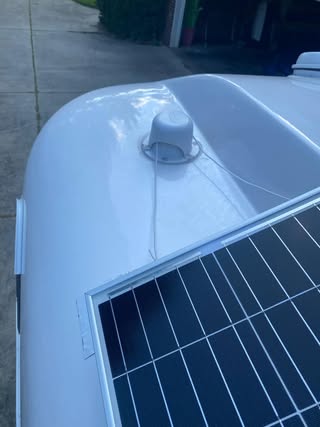
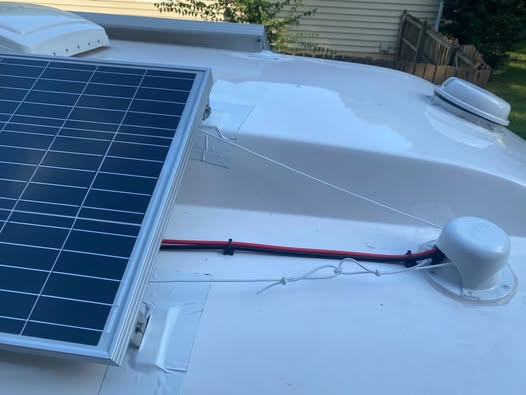
I didn’t want to put any holes in the roof so I used VHB tape on the panel legs and went through the grey vent for the wire run.

Excited to see how much this will extend our boondocking capabilities.

EDIT 9/14/21:

I’ve added eternabond over the feet to give it a little more holding power and ensure the tape is protected from the elements. This should increase the tensile strength of the feet from 270 lbs of tensile strength to 336 lbs of tensile strength per foot. So my total tensile strength is over 1400 lbs per panel. With a weight of 14 lbs, that’s a 100x safety factor to handle any wind factors. From my research and calculations, 130 mph wind hitting the panel laterally would generate 275 lbs. That gives me a 5x safety factor for what i consider a worst case scenario.

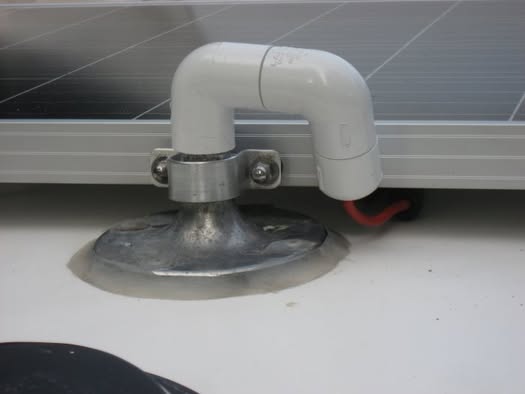
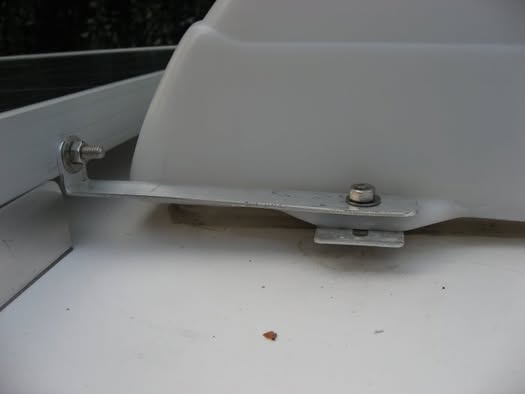
I’ve also added more tethers to my install so if any panels come off they should stay on the casita. I included one around the a/c unit and others around the vent caps. And all of the panels are connected to one another with the idea that it’s doubtful that all 4 panels would come off at one time.

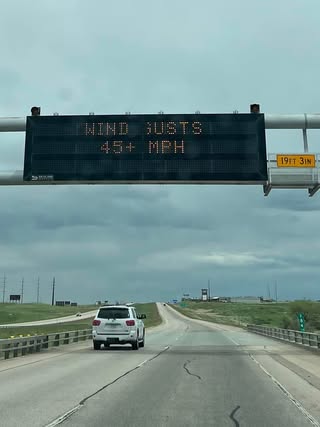
Now that the tape has reached 100% adhesion, we plan on going for a test drive tomorrow. My wife will be pulling the Casita and I will be following to see how the panels are holding up. We’ll increase the speeds of the test until 65 or so mph.
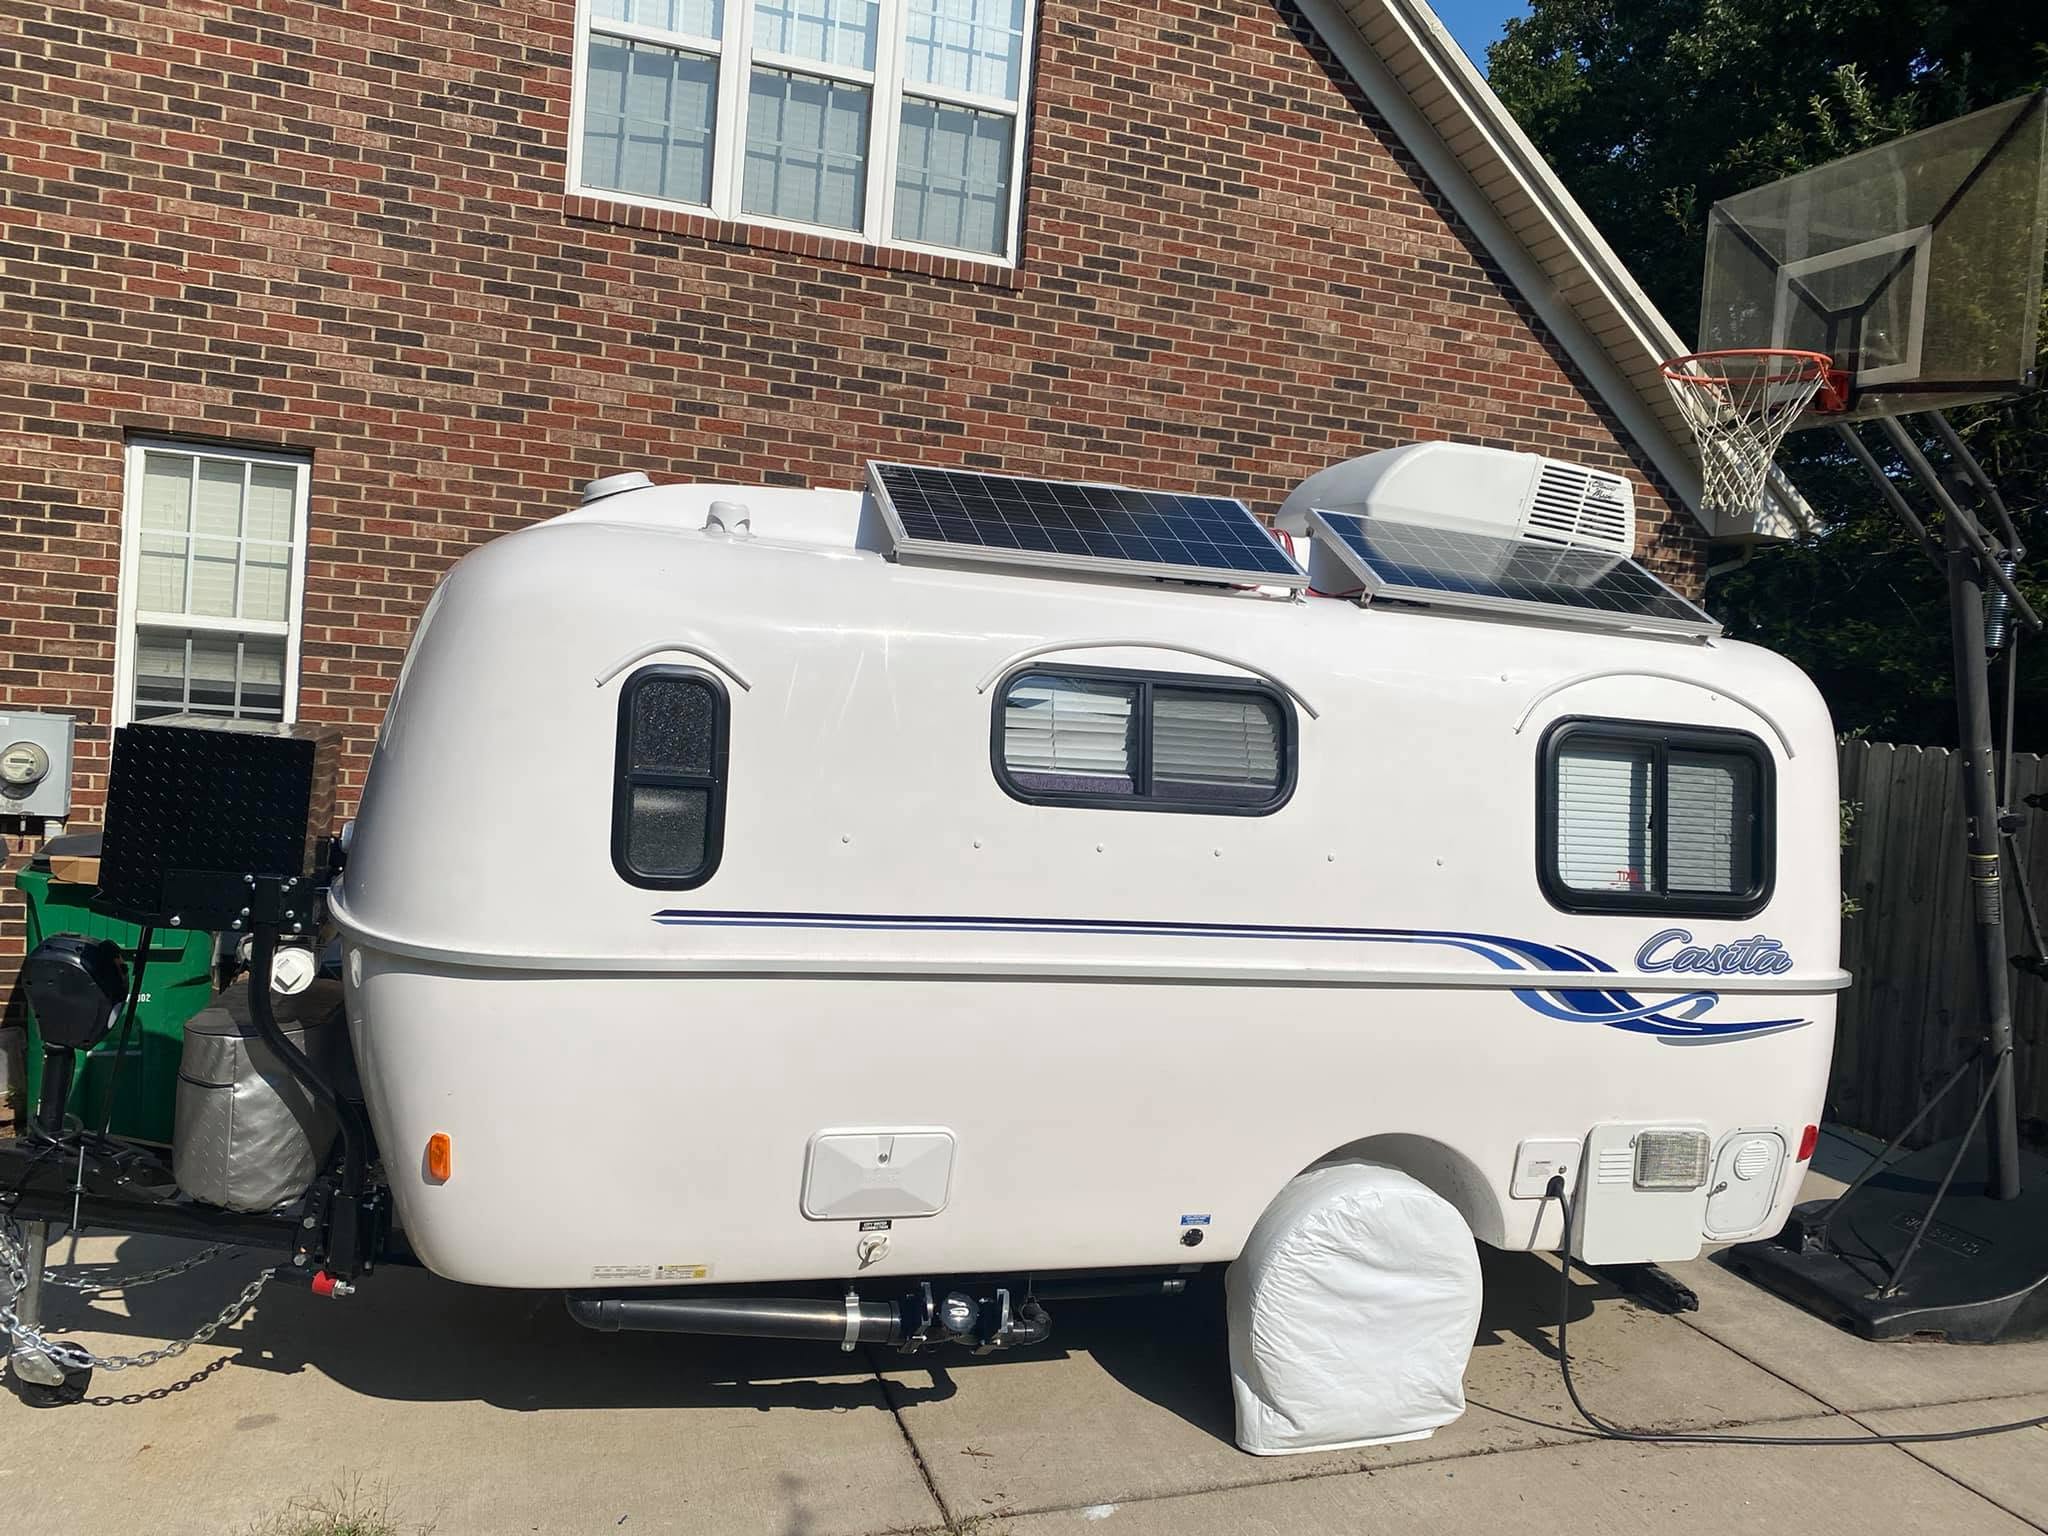
👍 ❤️ 123 reactions at capture145 comments shown by Facebook

The complete photo set

Four panels, a careful wire path, and batteries beneath the bunks.

Select any image to open the full-size photo.

Added September 30, 2021

Steve’s detailed walkthrough

After the questions began arriving, Steve recorded a longer video explaining the 400W installation.

Watch the walkthrough ↗

Original conversation

The questions, cautions, tests, and later updates.

Comments remain grouped with their replies so each answer keeps its original context. Attached images and useful links are preserved inside the relevant conversation.

144 accessible entries37 comment threads107 replies40 visual attachments

Facebook displayed 145 comments at capture. 144 comment and reply entries were accessible and are preserved below; one counted entry was unavailable in the loaded Facebook view.

Steve Judge
↗

Looks great. I've been thinking about doing this too.

👍 1
J.P. Joel P. Smith
↗

Looks great! I worry about VHB in the sun. I put 26 rivets through my roof.

Archived image attached by J.P. Joel P. Smith
👍 4
8 replies
Steve PaynterReplying to J.P. Joel P. Smith
↗

J.P. Joel P. Smith well, the rivets have a roof over them. I imagine that helps prevent leaking.

👍 1
Steve PaynterReplying to Steve Paynter
↗

What type batteries have you got, and how many watts in solar?

Steve PaynterReplying to Steve Paynter
↗

Your lucky, you don't have an AC on top to have to work around.

👍 1
J.P. Joel P. SmithReplying to Steve Paynter
↗

Steve Paynter I’ve got 990 watts and 208 ah lithium running at 24v. So it’s similar to 4 x 100 ah batts.

Steve PaynterReplying to Steve Paynter
↗

Thats alot of solar. Thats why I mentioned the AC. I have a 2018 FD and with the AC, I, like Steve Lineberry could only fit 400 watts.I have (2) 170 Ah batteries running 12v. I rarely have a problem keeping the batteries charges. As with you too, I'm sure.

Steve PaynterReplying to J.P. Joel P. Smith
↗

J.P. Joel P. Smith do you have an AC on top? I'll bet not.

J.P. Joel P. SmithReplying to Steve Paynter
↗

Steve Paynter no, mines got the window unit in the front.

Jason ArredondoReplying to J.P. Joel P. Smith
↗

J.P. Joel P. Smith what size are the rivets and how did you attach them? Just drill straight in?

Tom Griebe
↗

I have mine VHB taped on but I added small brackets for just in case. So far the VHB has been great.

👍 1
11 replies
Steve LineberryReplying to Tom Griebe
↗

Tom Griebe thanks for this. what type of small brackets? What did you attach them to? Any pictures?

Tom GriebeReplying to Steve Lineberry
↗

Steve Lineberry In my case, I had an old antenna post at the front that I attached to as well as the roof vent cover. I also added three small panels behind the awning. The base of each is attached to the awning. I’m out of town, so no pix as they live on my desktop.

👍 1
Jason ArredondoReplying to Tom Griebe
↗

Tom Griebe just going back through this post to figure out how I’m going to attach my solar panels. When you say you added brackets in addition to VHB tape, are you saying that you drilled through the roof? If so, would you mind telling me how you did it? I’m going with some larger heavier, solar panels, and want to be extra sure it’s on there safely. 

Tom GriebeReplying to Jason Arredondo
↗

Jason Arredondo No, I did not drill any additional holes. My 2005 had a TV antenna so I attached to that in the front and in back I ran two straps to the vent cover.

Archived image attached by Tom Griebe
Tom GriebeReplying to Tom Griebe
↗

To vent cover

Archived image attached by Tom Griebe
Jason ArredondoReplying to Tom Griebe
↗

Tom Griebe oh, that’s smart. Thank you. I think I’m going to go the VHB, dicor sealant, and eternabond tape route, but I’m thinking of adding a few rivets for extra insurance. I’m doing research but any suggestions as to what type and size I should go with?  I was going to include rivet caps so they look as good as possible on the inside 

Tom GriebeReplying to Jason Arredondo
↗

Jason Arredondo I think I'd use a couple of 1/4" stainless steel bolts and use an acorn nut on top to give it a finished look. Obviously, you want to seal the pass through well. I think I'd use butyl tape to seal it.

Jason ArredondoReplying to Tom Griebe
↗

Tom Griebe OK, great. I really appreciate it. All of my gear for my electric and solar overhaul starts coming in over the next few days and I’m excited to get working on it. I’ve stolen information and ideas from everybody. These groups are so helpful 

Jason ArredondoReplying to Tom Griebe
↗

Tom Griebe do you know what the thickness of the fiberglass is? Not sure how long the bolts need to be. 

Jason ArredondoReplying to Tom Griebe
↗

Tom Griebe i’m sure I will probably get my answer to how long of bolts I will need once I drill through the roof lol. I know that will depend on my mount as well. 

Tom GriebeReplying to Jason Arredondo
↗

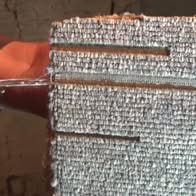
Jason Arredondo The fiberglass thickness varies but it is never more than 3/8", usually a lot less. I'd slice the carpet so the head of the bolt can be sealed directly against the fiberglass, then use contact cement to carefully re-glue the carpet over the head of the bolt. Be careful drilling through carpet as it can snag on a strand and cause a runner.https://www.youtube.com/watch?v=-WKX43QZe5s

Don't Drill Through Carpet When Making a Hole for Ductwork
Steve Lineberry
↗

We had a successful test this evening on the highway. We took her up to 65 mph and with me following behind, there was no movement of the panels. After stopping I checked them all and everything was solid. We’ll probably go on a longer trip this weekend with multiple hours on the highway. Things are looking good so far though.

Image attached by Steve Lineberry
👍 5
2 replies
Frank HigginsReplying to Steve Lineberry
↗

Steve, not a flutter or a flinch. Looks great!

👍 1
Steve LineberryReplying to Frank Higgins
↗

Frank Higgins thanks!!

Jorge O'Leary
↗

Mine is not as pretty, but, as the old refrain goes, "that is not going anywhere."

Archived image attached by Jorge O'Leary
👍 5
3 replies
Linus LiReplying to Jorge O'Leary
↗

Jorge O'Leary I am going to use this style plus VHB tape.

Jorge O'LearyReplying to Linus Li
↗

Linus Li Yes, I put VHB tape under the perforated steel angle pieces, and bolts only on corners. You might consider solid aluminum angles. Might look better and easy enough to drill, and, you can put the hole exactly where you want it. Also, alum angle would have more surface area for VHB to grip.

Linus LiReplying to Jorge O'Leary
↗

Jorge O'Leary very good ideas

Steve Lineberry
↗

After getting lots of questions from people about my solar install, I ended up making a video with more details: https://youtu.be/5lzwRLJOBI8

400w Solar Install on a 2021 Casita Heritage Deluxe 17’
👍 5
14 replies
Steve PaynterReplying to Steve Lineberry
↗

Steve Lineberry after you've been using it for awhile I'd like to hear whether you think you needed the extra juice from the dc to dc system. I had thought about it on my system but decided to try it first without it.

👍 1
Steve LineberryReplying to Steve Paynter
↗

Steve Paynter for sure, my current main thing i like about it is being able to detect when connected to the tow vehicle and turn on devices. I know before getting the solar i was able to get some charge back over it on the drive. Maybe 10Ah in a two hour drive. It’s a rainy travel day option to still get some charge back.

Steve PaynterReplying to Steve Lineberry
↗

Steve Lineberry i understand the rainy day approsch. That's kind of why I made the 200 w solar suitcase (but i doubt it'll help much on a rainy day). In case i needed it.With your family camping, and your energy use, how difficult is it to keep your state of charge in the 90% range or better?

👍 1
Steve LineberryReplying to Steve Paynter
↗

Steve Paynter We only went boondocking once before installing solar. We used 30Ah in 24 hours. This is what i used to speculate how much solar/battery I’ll need. I rounded up to 50Ah per day and wanted it to last 3 days without any solar.Last weekend we boondocked but under a lot of tree cover and barely got 100Wh for the whole day. We didn’t use as much battery up because the temperatures have been better. We are currently boondocking in Linville Gorge but I’ll know more about our usage over the next few months.

Steve PaynterReplying to Steve Lineberry
↗

Steve Lineberry that's very cool. I never did any calculations as to my energy requirements because I was totally new and had no idea what I would consume. I'm assuming you'll be inputting and graphing it in Excel (just kidding)?

👍 1
Steve LineberryReplying to Steve Paynter
↗

Steve Paynter i didn’t graph it, but i did use excel. . You know me too well.

🤣😁
👍 1
Steve LineberryReplying to Steve Paynter
↗

Steve Paynter this weekend it was so hazy and where i had our casita parked, it had so much tree cover i only got 80wh for the day. Upon leaving the BMV said we were down 16 Ah. After the two hour drive home, all at night so no solar, the battery was fully charged from the dc-dc charger. It looks like it was charging at about 10A which causes these results to make sense.

Archived image attached by Steve Lineberry
Steve PaynterReplying to Steve Lineberry
↗

Steve Lineberry that's good, 10 Ah an hour for a few hours is great. Now, when it's a sunny day I'd expect your solar so get about the same or more.Its a great sport "feed the batteries"!

👍 1
Mike HardemanReplying to Steve Lineberry
↗

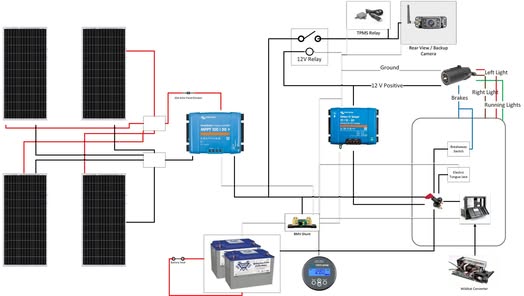
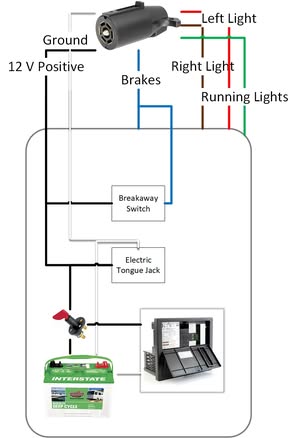
I appreciate the video, but it's hard to follow what wires you're referring to in it. Is there any way you could provide a schematic? Thanks.

👍 1
Steve LineberryReplying to Mike Hardeman
↗

Mike Hardeman working on it, maybe soon.

👍 1
Mike HardemanReplying to Steve Lineberry
↗

Steve Lineberry Thanks. That would be great.

👍 1
Steve LineberryReplying to Mike Hardeman
↗

Mike Hardeman Let's try this

Archived image attached by Steve Lineberry
👍 1
Mike HardemanReplying to Steve Lineberry
↗

Steve Lineberry Thanks very much!

👍 1
Steve LineberryReplying to Mike Hardeman
↗

Mike Hardeman For reference, this what the wiring looked like from the factory of the components that I touched.

Archived image attached by Steve Lineberry
👍 1
Steve Paynter
↗

That looks great Steve. How long did it take you to do the install?

👍 2
10 replies
Steve LineberryReplying to Steve Paynter
↗

Steve Paynter just solar portion took me most of the day yesterday. I spent another few hours this morning installing the solar controller and remounting the panels after the dicor had dried

Steve PaynterReplying to Steve Lineberry
↗

Steve Lineberry where did you put the batteries?

👍 1
Steve LineberryReplying to Steve Lineberry
↗

Under the bunks.

Archived image attached by Steve Lineberry
Steve LineberryReplying to Steve Paynter
↗

Steve Paynter here’s one mounted and the tray for the second.

Archived image attached by Steve Lineberry
Edited
Steve LineberryReplying to Steve Paynter
↗

Steve Paynter building and installing the battery mounts took quite a while. Probably 10-15 hours to get it right.

Steve PaynterReplying to Steve Lineberry
↗

Steve Lineberry they look great. That's a good place for them. You have a Liberty, I believe, with the bench with space under it, close to the electrical systems. My Freedom didn't permit me to place mine there. "They aren't going anywhere". Good job.

👍 1
Steve LineberryReplying to Steve Paynter
↗

Steve Paynter thanks, i actually have the heritage with the side bunks.

👍 1
Steve PaynterReplying to Steve Paynter
↗

Richard Baumgarten you have solar don't you?

Richard BaumgartenReplying to Steve Paynter
↗

Steve Paynter reading up on it definitely interested just weighing options now, and doing research

Steve PaynterReplying to Steve Paynter
↗

Good luck. I know you've been planning. I thought you have moved on it.

Steve Lineberry
↗

Update: just got back from a 4800 mile trip across the country and even had very windy conditions. The panels have held strong and there was no indication of them coming off.

Archived image attached by Steve Lineberry
Edited👍 2
1 reply
Shawn KnightReplying to Steve Lineberry
↗

Steve Lineberry good news for the people driving behind you.

👍 1
Kathy Miller
↗

Nice! I wish I knew more about solar so I could do something like this.

👍 3
1 reply
Tom GriebeReplying to Kathy Miller
↗

Kathy Miller Corso check out Will Prowse on YouTube. Very informative and a cutie.

👍 4
Steve Lineberry
↗

We went on a 500 mile round trip up I-77 through the mountains of Virginia to the mountains of West Virginia into the New River Gorge region for the weekend. We probably totaled 9 hours or so of driving at 65 mph speeds with large trucks passing us and varied winds through the mountains. The panels didn’t budge. This morning I examined the panels, as you can see in my video, I’m pushing on the panels and the whole trailer is swaying. If you listen you can even hear the water in the fresh water tank sloshing around.

Image attached by Steve Lineberry
👍 3
Larry Gross
↗

mounting issues aside, it looks like a significant level of power for boondocking. Same basic battery setup or more/lithium/etc?

👍 2
6 replies
Steve LineberryReplying to Larry Gross
↗

Larry Gross two 100 Ah Battleborn batteries

Sue PufferReplying to Steve Lineberry
↗

Steve Lineberry where did you put the second battery?

👍 1
Steve LineberryReplying to Sue Puffer
↗

Sue Puffer both batteries are under the side bunk.

Edited
Steve LineberryReplying to Sue Puffer
↗

Sue Puffer double battery mount under bunks

Archived image attached by Steve Lineberry
👍 1
Steve PaynterReplying to Steve Lineberry
↗

Steve Lineberry so you started with 2 batteries. Sounds perfect.

👍 1
Steve LineberryReplying to Sue Puffer
↗

Sue Puffer

Archived image attached by Steve Lineberry
👍 1
Ron Sanders
↗

Impressive, Great job !!!

👍 1
Melissa Rosado
↗

Following. Would love to hear your experience with this setup in your upcoming trips.

👍 2
4 replies
Jorge O'LearyReplying to Gerard Weatherby
↗

Gerard Weatherby in the link, epoxying is offered as a solution to "stronger" than tape, but, I think that depends how it is done. Epoxy will bond to the roughed up gel coat, but not form a solid bond to metal rails for instance. I suppose you could epoxy something made of wood or fiberglass and then mechanically attach that to the rails or panel.

👍 1
Gerard WeatherbyReplying to Jorge O'Leary
↗

Jorge O'Leary Personally, if I end up using roof solar I will be using mechanical fasteners in addition to a bonding agent. I'm typically conservative when it comes to engineering decisions.

👍 4
Linus LiReplying to Gerard Weatherby
↗

Gerard Weatherby That’s what I am going to do.

Tom GriebeReplying to Gerard Weatherby
↗

Gerard Weatherby Proper preparation is important as well as adequate mounting surface. VHB tape is used to hold truck bodies together.

👍 1
Roy Levi Teeler III
↗

Hello Steve if you don’t mind sharing a supply list for a few things on your solar setup . Like the wire size ,the little black things that you secured the wire from the panels to the roof,also the type of tape that you used to secure the panel feet . I’m gathering information before I attempt to. Do this. Thank you.

👍 1
3 replies
Steve LineberryReplying to Roy Levi Teeler III
↗

Roy Levi Teeler III Did you happen to check the description in my video? Let me know if you need more info. Thanks.

Roy Levi Teeler IIIReplying to Steve Lineberry
↗

Steve Lineberry it’s been a while. I will watch it again. I’ve never messed with solar stuff much except installing the little solar plug in on casita . I’m just not familiar with all the little parts like the connectors? The little straps that keepThe solar wire clean and in place on the roof . I’m going to keep it super simple. Nothing big time . Just going to install a 100 amp panel come down the vent stack , figure out a place for a controller. I don’t want mine in the closet like a lot of people because it’s easier , I’m wanting it else where .

👍 1
Steve LineberryReplying to Roy Levi Teeler III
↗

Roy Levi Teeler III you don’t need to watch the video, just open the description as i think i have a lot of things linked there.

Edited👍 1
Chuck Brown
↗

Impressive

👍 1
Frank Higgins
↗

Looks great

👍
👍 1
2 replies
Steve LineberryReplying to Frank Higgins
↗

Frank Higgins thanks!!

Frank HigginsReplying to Steve Lineberry
↗

You’re very welcome

Linda Turek
↗

Day two of solar install - broken record about how wonderful it was for you to post the video. Why did you use the gray tank vent and not the black tank vent? How did you run cable from gray tank vent in closet around the bathroom? Looks like you did it between the walls. Thank you for your help.

👍 1
4 replies
Steve LineberryReplying to Linda Turek
↗

Linda Turek i went with grey tank instead of black so the bathroom would have less holes in it that i need to waterproof. Also, i figured i could put some devices in the closet later if i wanted. Which is what i ended up doing later. Yes, i fished the wire around the bathroom.

Steve LineberryReplying to Linda Turek
↗

Linda Turek here’s a picture of where i have my solar controller mounted now

Archived image attached by Steve Lineberry
Steve LineberryReplying to Linda Turek
↗

Linda Turek and here is where i now have my dc-dc charger mounted

Archived image attached by Steve Lineberry
Steve LineberryReplying to Linda Turek
↗

Linda Turek the door closes up

Archived image attached by Steve Lineberry
Armen Stein
↗

Dang, that's a sweet setup. I think you've just moved your critical path to water and sewage.

👍 1
1 reply
Steve LineberryReplying to Armen Stein
↗

Armen Stein thanks!

Shawn Knight
↗

As much as I hate drilling holes in my trailer, it’s not if but when those panels are coming off.

GIF
👍 1
3 replies
Jorge O'LearyReplying to Shawn Knight
↗

Shawn Knight True. Thru-bolting and tape is the way I am doing mine. So, the bolts and nut shows on the inside, no big deal.

👍 1
Stacey MartinReplying to Shawn Knight
↗

Shawn Knight exactly. He is only accounting for the weight of the panels, not the force the wind will apply.

👍 2
Greg PohlmanReplying to Shawn Knight
↗

I'm thinking 1 @ 3/16th bolt and vhb per mounting plate will be plenty strong.

Raven McDavid
↗

Where’s the second battery?

👍 1
3 replies
Steve LineberryReplying to Raven McDavid
↗

Raven McDavid both batteries are under the side bunk beds

Steve LineberryReplying to Raven McDavid
↗

Raven McDavid double battery mount under bunks

Archived image attached by Steve Lineberry
Steve LineberryReplying to Raven McDavid
↗

Raven McDavid

Archived image attached by Steve Lineberry
Liam Logue
↗

Wondering why you picked the PD 4655 wildkat ? Instead of the progressive Dynamics 4645v

👍 1
1 reply
Steve LineberryReplying to Liam Logue
↗

Liam Logue the wildkat has a jumper that switches between lithium and wet cell. It’s also cheaper than the one you mentioned. So more compatibility for less money.

👍 3
Susan Pence
↗

Can you please show a closeup of the mounts

👍 1
7 replies
Steve LineberryReplying to Susan Pence
↗

Susan Pence

Archived image attached by Steve Lineberry
Steve LineberryReplying to Susan Pence
↗

Susan Pence

Archived image attached by Steve Lineberry
👍 1
Susan PenceReplying to Steve Lineberry
↗

Steve Lineberry thanks, where did you the mounts?

👍 1
Steve LineberryReplying to Susan Pence
↗

Susan Pence

Archived image attached by Steve Lineberry
👍 1
Steve LineberryReplying to Susan Pence
↗

Susan Pence

Archived image attached by Steve Lineberry
Steve LineberryReplying to Susan Pence
↗

Susan Pence i sealed them with dicor

Vickie Mangione
↗

If I come over, will you install mine please?

Garry Skaggs
↗

Nice

👍 1
Christine Davis
↗

Charles Brandon Davis next project?

Meg Colby
↗

Have you been on the road with your new installation yet? How fast have you driven? I’m just being a little bit concerned about holding the panels on with tape on those 4 feet.

👍 2
8 replies
Steve LineberryReplying to Meg Colby
↗

Meg Colby not yet, going to happen this week. When i shake one of the panels the whole trailer moves back and forth. From my research vhb tape can hold close to 50 lbs on a 1” x1” square. The feet are 3” x 1” and the panel weighs 14 lbs. A lot of people use vhb tape to mount solar on their casita and other trailers and they have had great success.

👍 4
Meg ColbyReplying to Steve Lineberry
↗

Steve Lineberry Sounds good. Keep us posted.

👍 1
Steve LineberryReplying to Meg Colby
↗

Meg Colby will do. It takes 72 hours for vhb tape to get to 100% strength. I’ll probably take it for a test on Wednesday around town. We are hoping to go for the weekend this coming one as well.

Stacey MartinReplying to Steve Lineberry
↗

Steve Lineberry Have you calculated the wind load based on highway speeds? I fear you are going to hurt someone.

Steve LineberryReplying to Stacey Martin
↗

Stacey Martin yep, done the calculations. I also have them tethered to one another. I may also tether them to the a/c unit for extra caution.

Stacey MartinReplying to Steve Lineberry
↗

Steve Lineberry ok, good luck!

👍 1
Greg PohlmanReplying to Steve Lineberry
↗

Steve Lineberry I have seen some people add ether bond tape to the mounts to beef up. VHB is pretty sticky stuff. Wish the mounts had more surface area. I want to believe it works but I'm from the school of over building.

👍 1
Steve LineberryReplying to Greg Pohlman
↗

Greg Pohlman added some tape per your suggestion

Archived image attached by Steve Lineberry
👍 1
Ken Lua
↗
Image attached by Ken LuaImage attached by Ken LuaArchived image attached by Ken Lua
👍 5
Valerie Welch
↗

Nice job!

👍 1
1 reply
Steve LineberryReplying to Valerie Welch
↗

Valerie Welch thanks!

👍 1
Frank Higgins
↗
Cricket Matchup Cricket fan in a white hat, sunglasses, and blue jacket is clapping with a bored expression on his face. sticker
👍 2
Notshort BT
↗

Can you run your AC with that GREAT setup?

👍 1
3 replies
Steve LineberryReplying to Notshort BT
↗

Britt Long i haven’t added an inverter yet, but i have a friend with a similar setup and running his a/c over his inverter for an hour takes his batteries down to 75%.

👍 2
Frank HigginsReplying to Steve Lineberry
↗

So, if everything else is equal and this test was run at night (ie no solar), the AC could run for almost 4 hours. LiOn batteries can run to low percentage of charge without damage.

👍 2
Steve LineberryReplying to Steve Lineberry
↗

Yep, sounds about right

Steve Lineberry
↗

I’ve also added eternabond over the feet to give it a little more holding power and ensure the tape is protected from the elements.

Archived image attached by Steve Lineberry
8 replies
Steve LineberryReplying to Steve Lineberry
↗

This should increase the tensile strength of the feet from 270 lbs of tensile strength to 336 lbs of tensile strength per foot. So my total tensile strength is over 1400 lbs per panel. With a weight of 14 lbs, that’s a 100x safety factor to handle any wind factors.

Steve LineberryReplying to Steve Lineberry
↗

From my research and calculations, 130 mph wind hitting the panel laterally would generate 275 lbs. That gives me a 5x safety factor for what i consider a worst case scenario.

Steve PaynterReplying to Steve Lineberry
↗

Steve Lineberry damn Steve! How do you do that!

👍 1
Steve LineberryReplying to Steve Lineberry
↗

Now that the tape has reached 100% adhesion, we plan on going for a test drive tomorrow. My wife will be pulling the Casita and I will be following to see how the panels are holding up. We’ll increase the speeds of the test until 65 or so mph.
👍 1
Meg ColbyReplying to Steve Lineberry
↗

I'm excited for you. Please keep us posted.
👍 1
Steve PaynterReplying to Steve Lineberry
↗

Steve Lineberry you've really done a great job all round. I need to catch up with you. I still have several of the last steps to do.

👍 1
Steve LineberryReplying to Steve Paynter
↗

Steve Paynter thanks! For sure, let’s get together sometime soon.

Steve PaynterReplying to Steve Lineberry
↗

Steve Lineberry absolutely. I'm heading out tomorrow for about a week. After that I'll give you a ring.Are you going to the October gathering of Carolina Casitas at Davidson campground?

Steve Lineberry
↗

I’ve added more tethers to my install so if any panels come off they should stay on the casita. I included one around the a/c unit and others around the vent caps. And all of the panels are connected to one another with the idea that it’s doubtful that all 4 panels would come off at one time.

Archived image attached by Steve Lineberry
2 replies
Steve LineberryReplying to Steve Lineberry
↗
Archived image attached by Steve Lineberry
👍 1
Steve LineberryReplying to Steve Lineberry
↗
Archived image attached by Steve Lineberry
👍 1
KC Honie
↗

Very nicely done

👍 1
1 reply
Steve LineberryReplying to KC Honie
↗

KC Honie thanks!

Ken Lua
↗

What do you do with all that power!

👍 1
Louise Bostwick
↗

Awesome!

👍 1
Lisa Hieatt Johnston
↗

Shane Johnston

Source and attribution

Shared with Steve’s permission.

The words above are presented as captured, including spelling, punctuation, dates, names, and the evolving technical advice in the discussion. This page is not affiliated with Facebook or the Casita Life group; it presents Steve’s modification and the conversation that helped other Casita owners understand it.

Open the source post on Facebook ↗