
← Back to modifications

Community modification · Plumbing

Faster, more complete gray-water drainage

Replacing the restrictive older drain path with larger ABS pipe, two gentle bends, and a continuous downhill run improves both flow and usable tank capacity.

At a glance

Owner
Tom Griebe
Trailer
2005 17-foot Casita; newer trailers differ
System
Plumbing
Difficulty
Advanced DIY or RV-shop installation
Tools
Specific tool list was not published
Dimensions
Original 1½-inch path replaced with 2-inch ABS feeding the 3-inch valve
Reversible?
Not documented; inspect the tank outlet before altering it

The project, consolidated

What changed

Tom traced slow drainage on his 2005 17-foot Casita to the original outlet arrangement: 1½-inch pipe extended into the tank, the route used three 90-degree turns, and part of the run was slightly uphill.

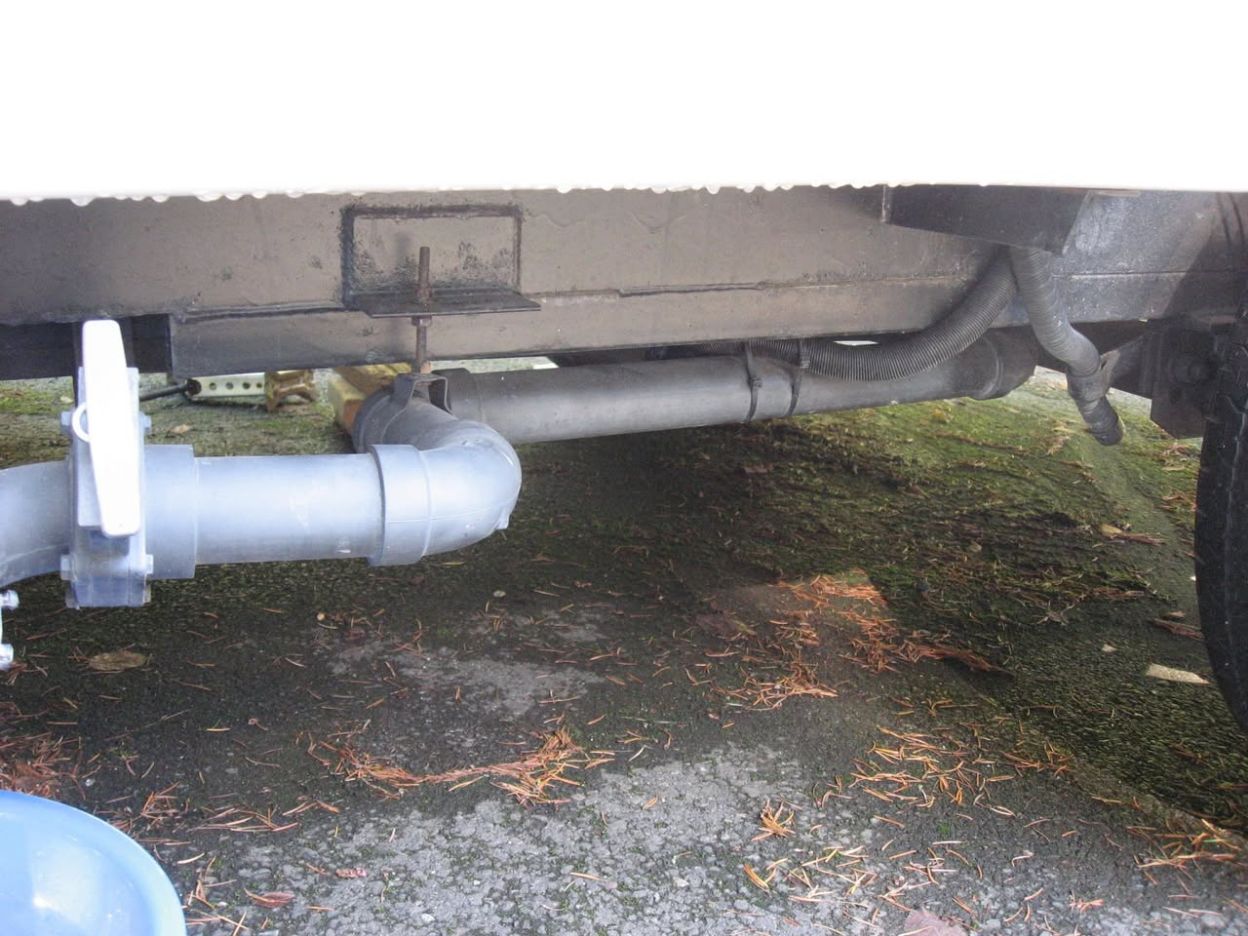
He attached 2-inch ABS outside the tank outlet, replaced the sharp turns with two 45-degree fittings, and maintained fall to the bottom of the 3-inch dump valve. The result was noticeably faster flow and better access to the tank’s capacity.
Owner photographs

See the finished work.

Photos are reproduced as visual documentation of this community project and credited to the project owner.

Reworked gray-water drain plumbing beneath a Casita1 / 1
The completed outlet uses a larger exterior connection and a straighter, downhill path to the dump valve.

How the approach works

Project outline

  1. Document the original outlet height and routing before removing parts.
  2. Remove the restrictive fittings and confirm how far the original pipe projects into the tank.
  3. Fit the larger exterior connection without introducing another internal restriction.
  4. Use gentle bends and maintain a continuous downhill pitch to the dump valve.
  5. Support the assembly, fill-test the tank, and inspect every joint for leaks and retained water.

The useful part of the thread

What the comments clarified

Owners reported a large practical improvement

Several commenters described faster dumping and recovered usable capacity after similar conversions. The exact gain depends on the original plumbing and the shape of the tank.

A bowed tank can still hold water

Plumbing alone may not fully empty a tank whose bottom sags below the outlet. Owners suggested temporarily raising the curb-side or opposite side with a 2×4 or Andersen-style leveler while dumping.

There are DIY and installed options

The discussion referenced Gene’s Casita Forum instructions and a complete Little House Customs kit. Owners who did not want to work under the trailer suggested a mobile RV technician or small independent shop.

Later Casitas are different

Commenters noted that Casita revised part of the arrangement around mid-2017. Inspect what is actually installed before ordering a kit or copying dimensions from an older trailer.

Other ways owners handled it

Alternatives and variations

  • Use the documented DIY approach after measuring the existing outlet and clearance.
  • Buy a complete conversion kit or have an RV technician install it.
  • Use a leveling block during dumping when tank bow—not pipe restriction—is the remaining problem.

Community-sourced summary. This page consolidates an owner’s Facebook post and the practical points raised in its comments. It is not Casita factory guidance. The original thread may require Facebook sign-in or group membership.

See the post and full discussion ↗